SenseCAP GPS Tracking Devices for LoRaWAN Asset Monitoring
Connect compatible SenseCAP trackers to Telemetry2U for live location data, historical routes, motion and shock events, battery status and configurable alerts. This page covers the wider SenseCAP tracker range while retaining a complete setup guide for the compact T1000-A LoRaWAN tracker.
Track Portable Assets, Equipment and Mobile Operations
Use a private LoRaWAN network or a supported public or hosted network, then bring tracking data into the same Telemetry2U platform used for dashboards, reports, notifications and other IoT applications.
LoRaWAN GPS Tracking with Live Maps, Events and Historical Routes
SenseCAP trackers combine location technologies with low-power LoRaWAN communications. Telemetry2U turns the received payloads into readable positions, sensor values, event states, maps, charts and alert conditions.
One Tracking Platform for Location and Device Status
The compact SenseCAP T1000 family can determine outdoor position using GNSS and support indoor location workflows using scanned Wi-Fi access points or Bluetooth beacons. Available data depends on the tracker model, firmware, positioning mode and decoder used for the integration.
- Live and recent positions: Display tracker coordinates and current device status.
- Historical travel routes: Review movement over a selected time range on the Telemetry2U map.
- Motion and shock events: Record movement, inactivity and impact events where the hardware reports them.
- Environmental context: T1000-A and T1000-E variants can report temperature, light and movement data.
- Offline record recovery: Supported trackers can cache records while outside LoRaWAN coverage and upload them after reconnecting.
- Battery and communication status: Check power level, last contact and device health from the platform.
- Configurable notifications: Create alerts for reported sensor values, event bits and operating conditions.
LoRaWAN coverage can come from a private network with a site gateway or a compatible public or hosted network service. Reporting intervals, positioning frequency and event behaviour should be selected around battery life, coverage and the operational value of each update.

Choose a SenseCAP Tracker for the Asset, Environment and Integration
The SenseCAP range now extends beyond the original T1000-A. The right model depends on enclosure, sensors, battery strategy, firmware control and the location data required. Confirm Telemetry2U decoder support before deployment.
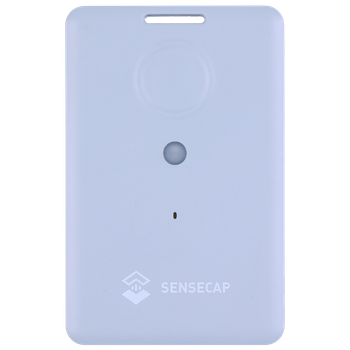
SenseCAP T1000-A
Compact rechargeable card tracker with GNSS, Wi-Fi and Bluetooth positioning plus temperature, light and 3-axis motion sensing. This is the model used in the configuration guide below and in the existing Telemetry2U demonstration dashboard.
- Portable assets and personnel workflows
- Environmental and motion event context
- SOS and manual event inputs
SenseCAP T1000-B
Uses the same compact tracking format and positioning technologies without the additional temperature and light sensors. It can suit projects where location and movement are required but environmental measurements are unnecessary.
- Location-focused asset tracking
- GNSS, Wi-Fi and Bluetooth positioning
- Lower-complexity payload requirements

SenseCAP T1000-E for LoRaWAN
Open-source LoRaWAN tracker for projects that need control over device firmware, payloads or custom behaviour. It includes positioning, temperature, light and motion capabilities, but requires the exact firmware and decoder to be aligned with Telemetry2U.
- Open-source firmware development
- Custom payload and event logic potential
- Integration assessment required
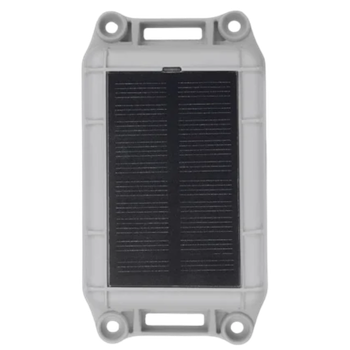
SenseCAP T2000 Series
Industrial tracker family for longer-term outdoor and equipment deployments. T2000 models add an IP67 enclosure, anti-tamper event detection and larger-battery or solar-assisted options depending on the selected variant.
- Heavy equipment and outdoor assets
- Longer maintenance intervals
- Rugged and tamper-aware installations

SenseCAP tracker model names, payload formats and firmware options continue to evolve. Telemetry2U should confirm the selected hardware, regional frequency plan and decoder before a purchase or fleet rollout.
Configure a SenseCAP T1000-A and Connect It to Telemetry2U
The following worked example brings the device setup, Telemetry2U registration and network options into one sequence. It applies to the SenseCAP T1000-A and should not be assumed to match T1000-E or T2000 firmware screens.
Before You Open Advanced Configuration
Install the SenseCAP Mate app , scan the QR code on the tracker, connect through Bluetooth and open Advanced Configuration. Keep the official SenseCAP T1000-A/B user guide available for model-specific details and firmware changes.
- Confirm the tracker is charged and running current supported firmware.
- Identify the LoRaWAN region and sub-band used by the selected network.
- Record the Device EUI and App Key before leaving the LoRa settings screen.
- Choose reporting intervals that balance tracking detail, coverage and battery life.
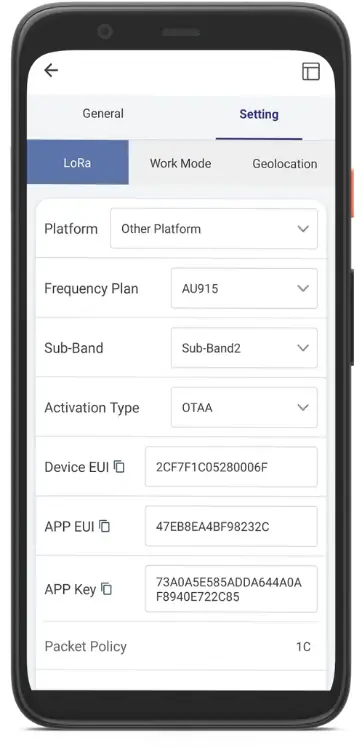
1. Set the LoRaWAN Network
In Settings > LoRa, choose Other Platform. Select the frequency plan and sub-band used by your network. For the Telemetry2U AU915 example, use the values supplied for the gateway and network server rather than assuming a default sub-band.
Record the Device EUI and App Key. They are required when the device is registered with the LoRaWAN network and Telemetry2U.

2. Choose Periodic or Event Mode
In Settings > Work Mode, select periodic reporting for predictable updates or event mode when sensor and movement events should control transmissions. Shorter intervals provide more route detail but consume more battery and network capacity.
Configure only the event thresholds and intervals that support an operational response. Excessive event traffic can reduce battery life.
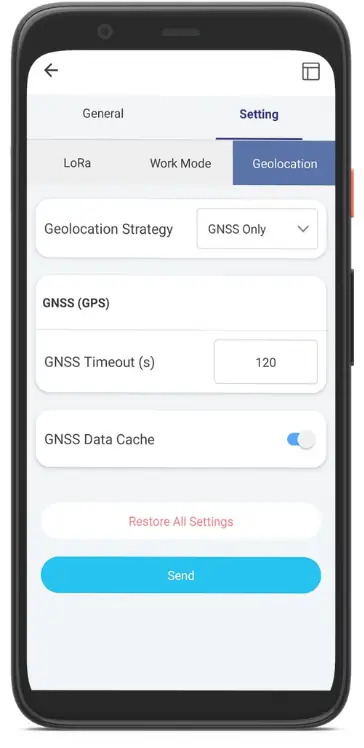
3. Configure Geolocation
In Settings > Geolocation, use GNSS Only for the preserved Telemetry2U T1000-A example. Enable GNSS Data Cache so location records can be stored while the tracker is outside LoRaWAN coverage.
Select Send to apply the settings, then return to the home screen and allow the device to reboot.
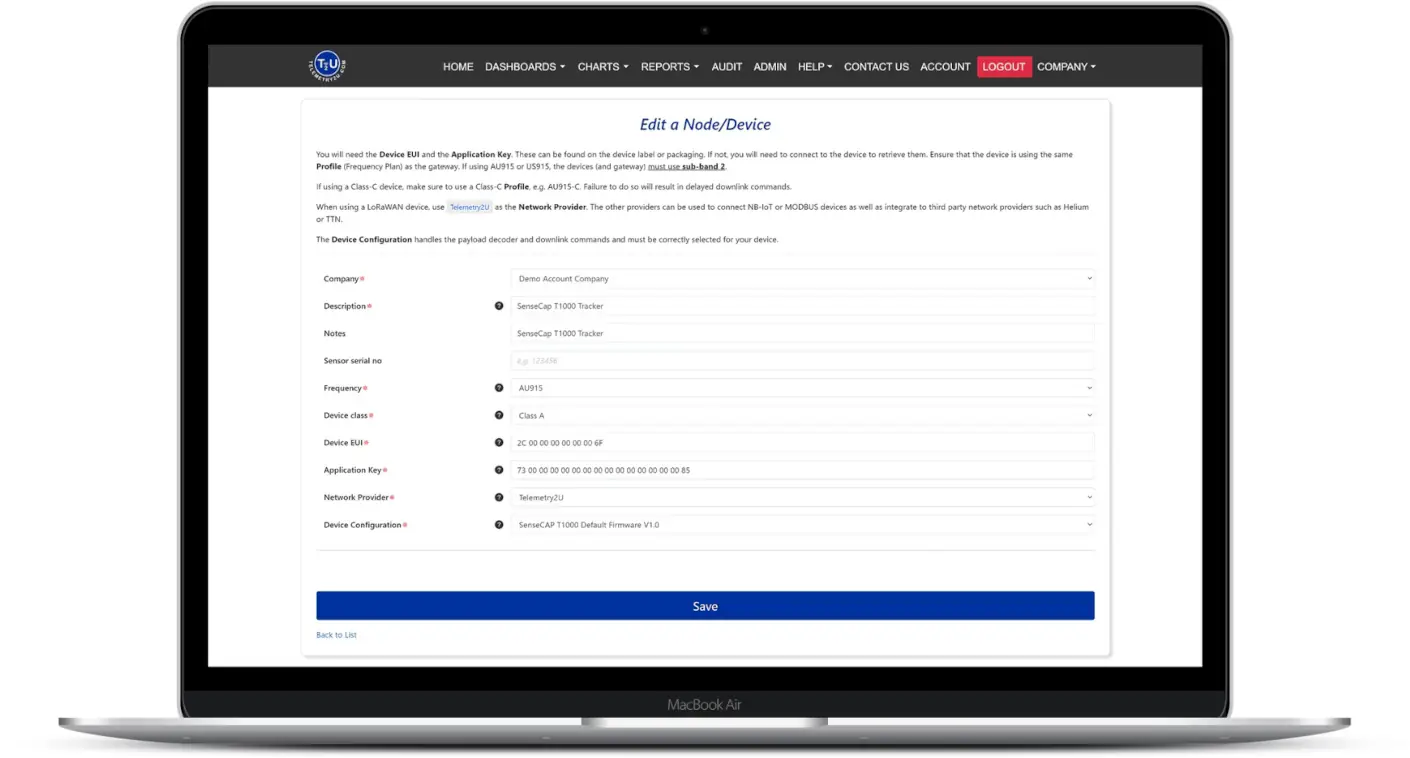
Register the T1000-A with Telemetry2U
After creating a Telemetry2U account, open Admin > Node Maintenance and select Add New Device. Enter the values recorded from the app and match the device configuration to the installed T1000-A firmware.
- Description: Use a clear asset, person, vehicle or tracker name.
- Frequency: Select the same regional plan used by the device and network.
- Device class: Use Class A for the standard T1000-A configuration.
- Device EUI and App Key: Enter the credentials recorded in the SenseCAP app.
- Network provider: Select Telemetry2U for its network server or the applicable third-party integration.
- Device configuration: Select the T1000 decoder that matches the deployed firmware.
Save the record, confirm the LoRaWAN gateway or public network is available, then press the tracker button to request an uplink. The first decoded record should appear in the platform when the device, network routing and credentials are correct.
Refer to the Telemetry2U node-maintenance documentation and the IoT platform quick guide for the wider account and device setup process.
Use a Private LoRaWAN Network, Helium or The Things Industries
A fixed site can use a private LoRaWAN network with its own gateway, while mobile tracking can benefit from compatible public or hosted network coverage. Telemetry2U can receive data from third-party network integrations when the network application, payload routing and device credentials are configured correctly.
Review the Telemetry2U Helium integration guide and working examples before configuring the network route.
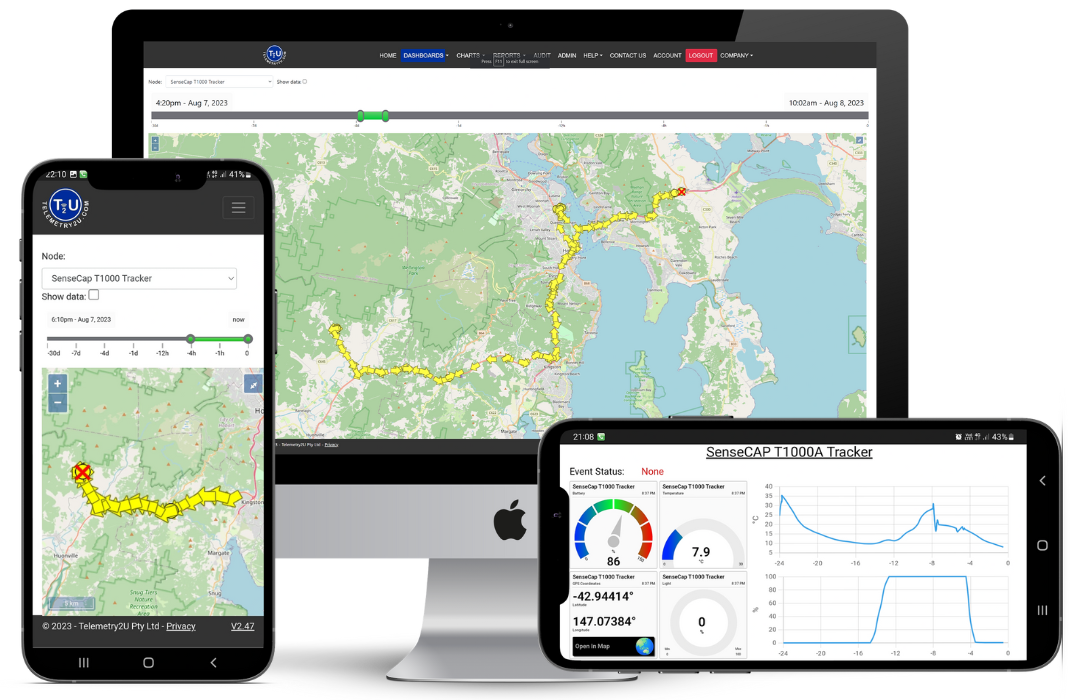
See SenseCAP Location and Sensor Data on a Telemetry2U Dashboard
Live Status, Charts and Map Access in One View
Build a dashboard around the asset, user or operation rather than a fixed hardware template. Display location, sensor readings, event status, battery level and communication information using the widgets relevant to the tracker.
Move from a Current Position to the Full Travel History
Selecting a dashboard map widget opens the Telemetry2U map, where authorised users can review tracker positions and historical routes over a chosen period. Charts can be opened from sensor widgets to investigate temperature, battery voltage, motion events and other decoded values.
- Arrange and resize dashboard widgets for different teams and screen sizes.
- Duplicate dashboards for assets, sites, customers or operational groups.
- Open detailed historical charts from individual sensor widgets.
- Review movement routes and location history on the map page.
- Share access according to the users and permissions configured for the account.
SenseCAP Tracking Dashboard
Live demonstration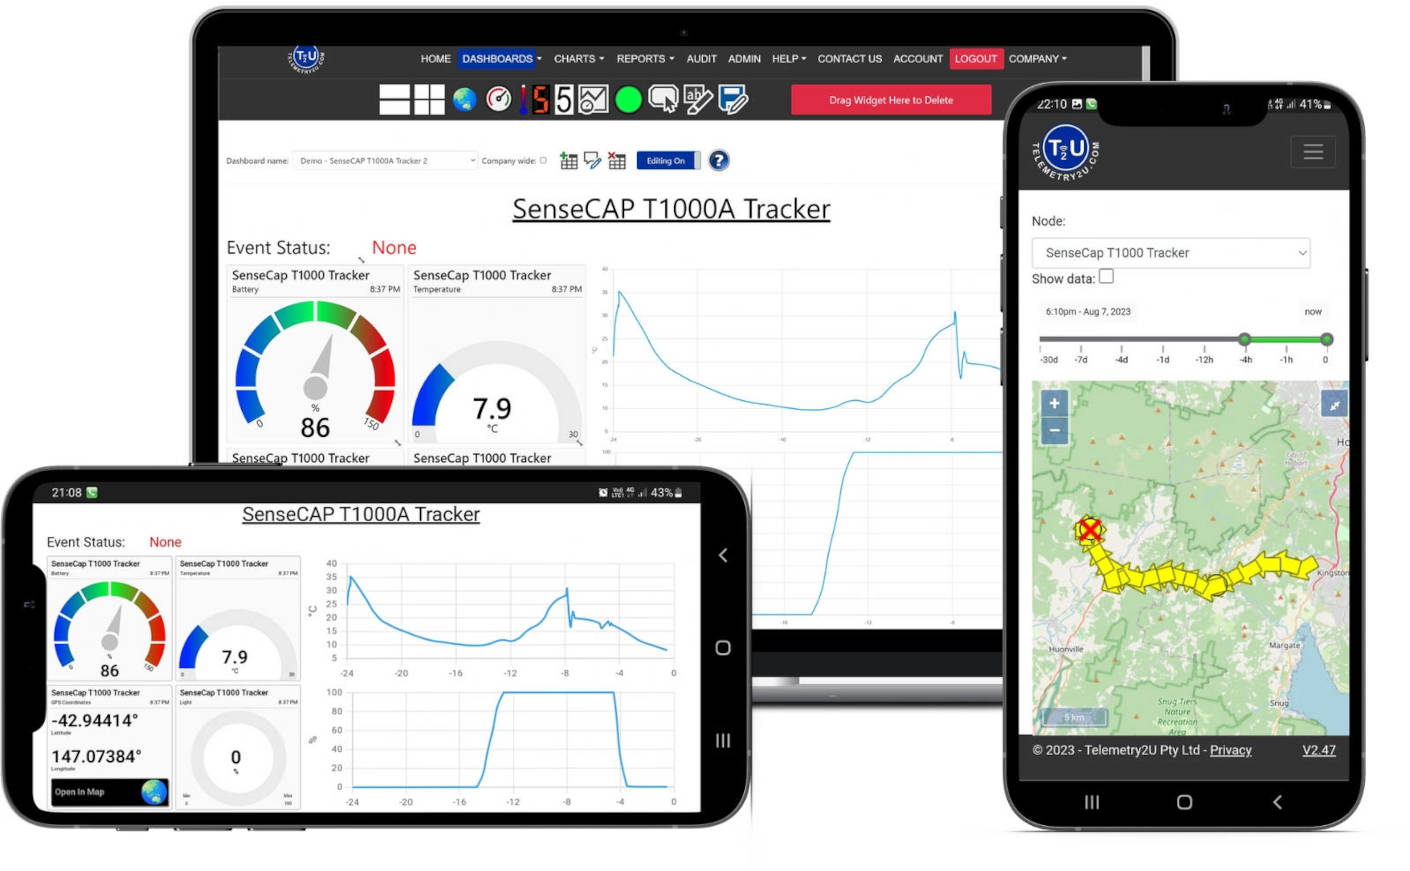
Example T1000-A dashboard shown for demonstration. Available location methods, sensors and events depend on the tracker model, firmware and decoder.
Configure Alerts for Motion, Shock, SOS, Temperature and Battery Status
Telemetry2U can evaluate decoded tracker measurements and event flags. The available alert conditions depend on the selected SenseCAP model and the data included in its uplink payload.
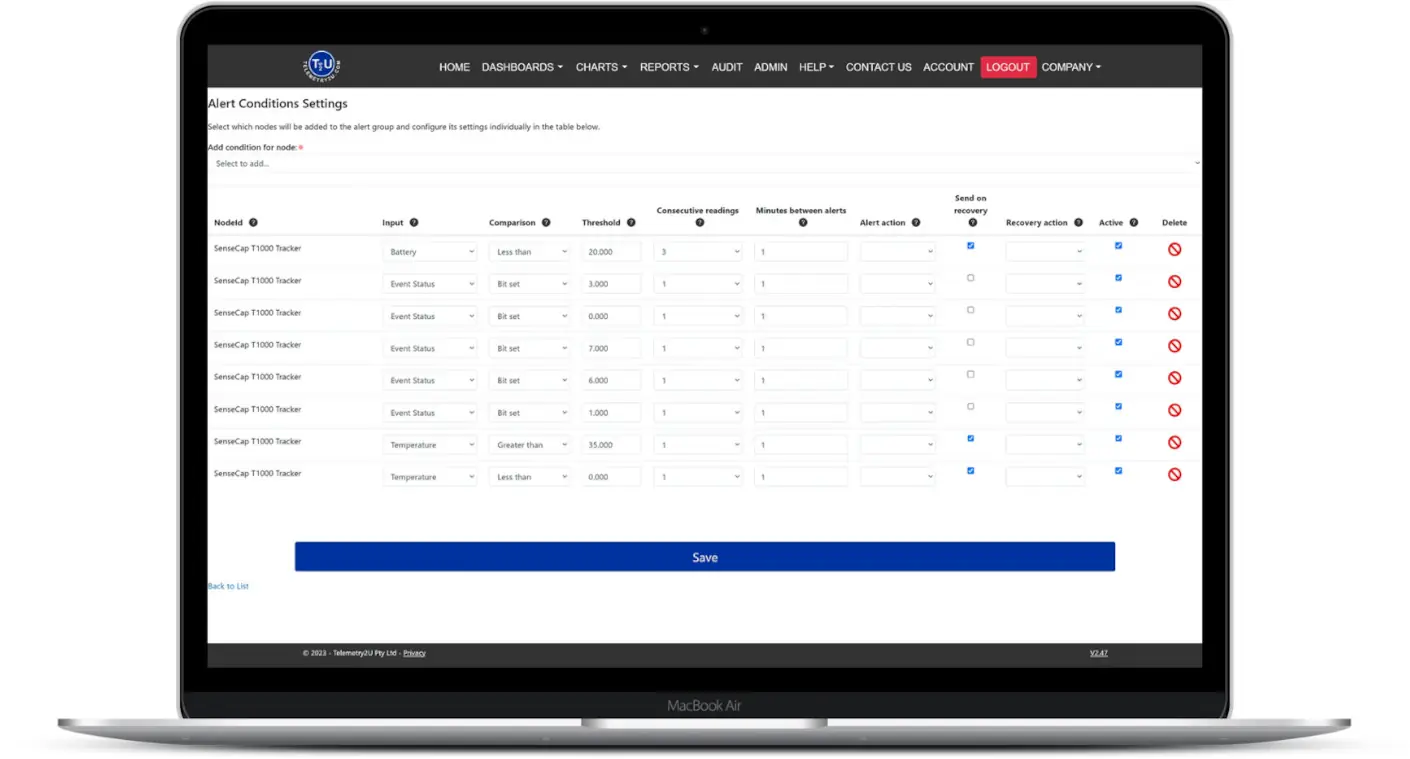
Turn Tracker Events into an Operational Response
Add users and notification groups, then open Admin > Alerts and create an alert group. Numeric values such as temperature, light and battery voltage can use threshold conditions. T1000-A event flags use the Bit Set condition type in the preserved decoder example.
- Bit 0: Device started moving
- Bit 1: Device stopped moving
- Bit 2: Shock detected
- Bit 3: Device has been motionless
- Bit 4: Temperature event triggered
- Bit 5: Light-level change detected
- Bit 6: SOS signal activated
- Bit 7: Manual button event detected
Configure recovery behaviour, notification recipients and the number of consecutive records required before an alert is raised. Email, SMS or voice notifications can be used where the relevant channel is enabled for the account.
For the full alert workflow, see Section 6.3 of the Telemetry2U administration documentation .
Need the Right SenseCAP Tracker and Network Path?
Telemetry2U can help assess the tracker model, LoRaWAN coverage, reporting interval, payload decoder, dashboard and alert workflow before a fleet is deployed.
Use the Same Platform for Tracking and Wider IoT Monitoring
A Telemetry2U account can combine compatible trackers with stationary LoRaWAN, NB-IoT and LTE-M devices. This allows location, environmental conditions, equipment status, energy, water and remote-control applications to be managed through one platform rather than separate device portals.
- Combine mobile trackers and fixed monitoring devices in one account.
- Create dashboards for operations, customers, sites or asset groups.
- Use common user access, alert groups, reporting and data-export tools.
- Expand from a T1000-A pilot to different hardware as the application changes.
Explore the available IoT devices and sensors, review other IoT monitoring applications or compare the wider Telemetry2U platform features.

SenseCAP LoRaWAN GPS Tracking FAQ
Answers to common questions about SenseCAP tracker models, Telemetry2U integration, public LoRaWAN networks and alert configuration.
This page covers the wider SenseCAP LoRaWAN tracker family. The SenseCAP T1000-A is the worked Telemetry2U configuration example. T1000-B, T1000-E for LoRaWAN and T2000-series devices can be assessed for integration, but the selected firmware, LoRaWAN region, payload format and Telemetry2U decoder must be confirmed before deployment.
Both are compact LoRaWAN trackers that support GNSS, Wi-Fi and Bluetooth positioning. The T1000-A adds temperature, light and motion sensing, while the T1000-B is intended for location tracking without the additional environmental sensors.
The T1000-E for LoRaWAN uses open-source firmware and can be considered for a custom Telemetry2U integration. Compatibility depends on the firmware build, payload format, enabled measurements, regional frequency plan and an appropriate decoder, so the integration should be confirmed before purchasing hardware for a project.
The T2000 series is designed for longer-term industrial asset tracking. It adds a more rugged IP67 enclosure, anti-tamper detection and higher-capacity or solar-assisted power options depending on the model. The compact T1000 family is better suited to wearable, portable and space-constrained applications.
Yes. A compatible SenseCAP LoRaWAN tracker can use a private network or a public or hosted network service such as Helium or The Things Industries. The network application, device credentials, payload routing and Telemetry2U integration must be configured correctly for data to reach the platform.
Yes. Where the selected tracker reports the required event or measurement, Telemetry2U can apply conditions for movement, shock, inactivity, SOS, temperature, light or battery level. Notifications can then be sent through the alert channels enabled for the account.