Configure Your LoRaWAN Gateway’s Wi-Fi Using a Smartphone
This guide walks you through the steps to configure Wi-Fi on your Dragino LoRaWAN gateway using its built-in access point. The access point is enabled by default, and the entire process can be completed easily with a smartphone.
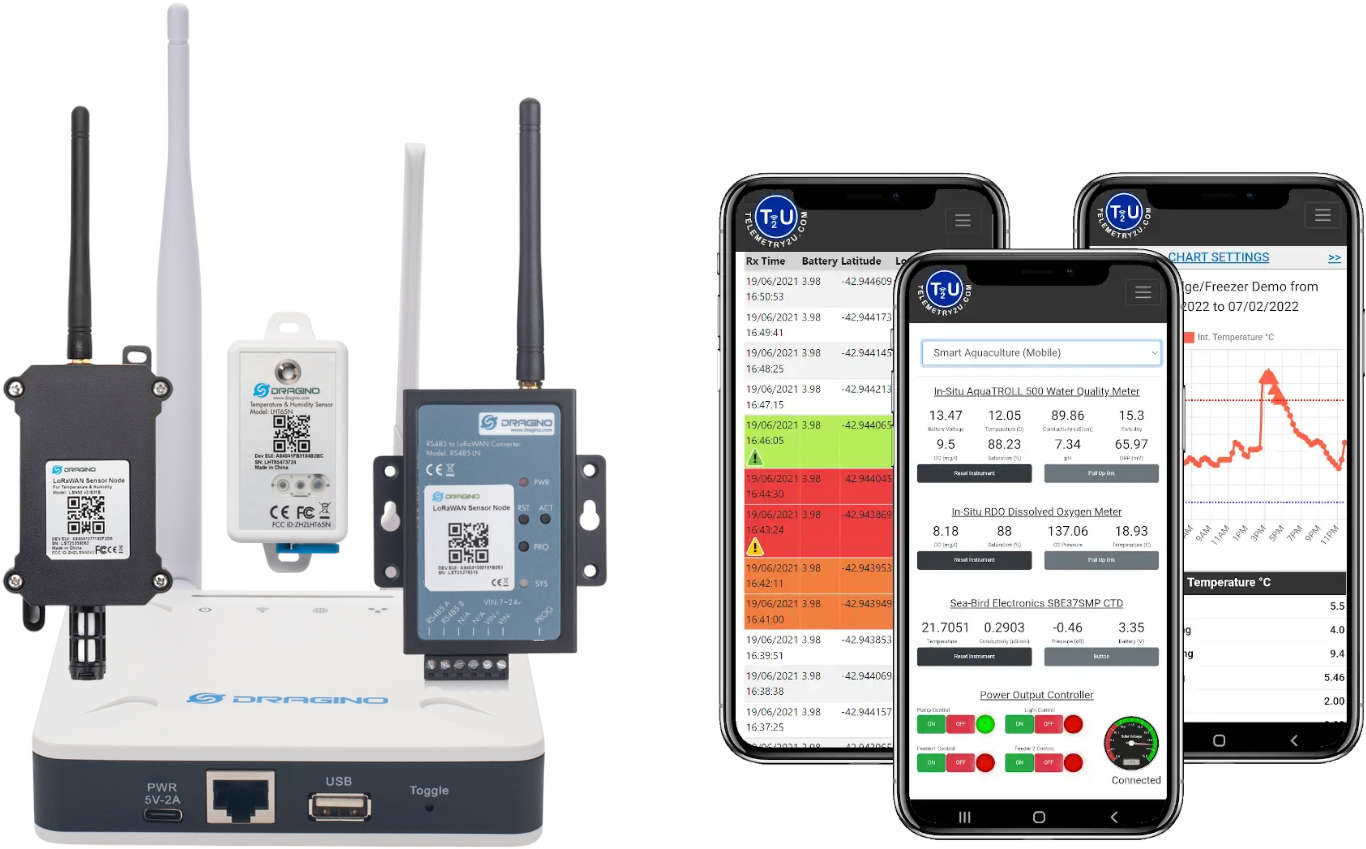
Smartphone-Based Wi-Fi Configuration for Your Gateway
If you purchased a Dragino LoRaWAN gateway from our online store, it comes pre-configured in a plug-and-play format and linked to your Telemetry2U (T2U) account before shipping. All you need to do is connect it to 240V power and provide an internet connection.
While Ethernet offers the most reliable connection, many users prefer Wi-Fi for added flexibility during gateway placement.
All Dragino gateways shipped by Telemetry2U have the Wi-Fi Access Point (AP) enabled with default settings. You can easily connect to the gateway using your smartphone or laptop and configure the Wi-Fi client settings through the access point.
Note:
In most cases, your gateway will connect to the internet without any issues. However, some networks may require additional configuration—such as opening a port on your firewall or whitelisting the gateway's MAC address. Read more about that here.
What You’ll Need to Configure Your LoRaWAN Gateway
- An active Telemetry2U account on a Premium Plan, with your Dragino gateway pre-configured and linked.
- Access to a working Wi-Fi network with internet connectivity.
- A smartphone (or laptop) to access the gateway’s user interface via the built-in access point.
Connect to Your Gateway’s Wi-Fi Access Point (AP)
Power on the gateway and wait a few minutes for it to fully boot. Ensure Wi-Fi is enabled on your smartphone.
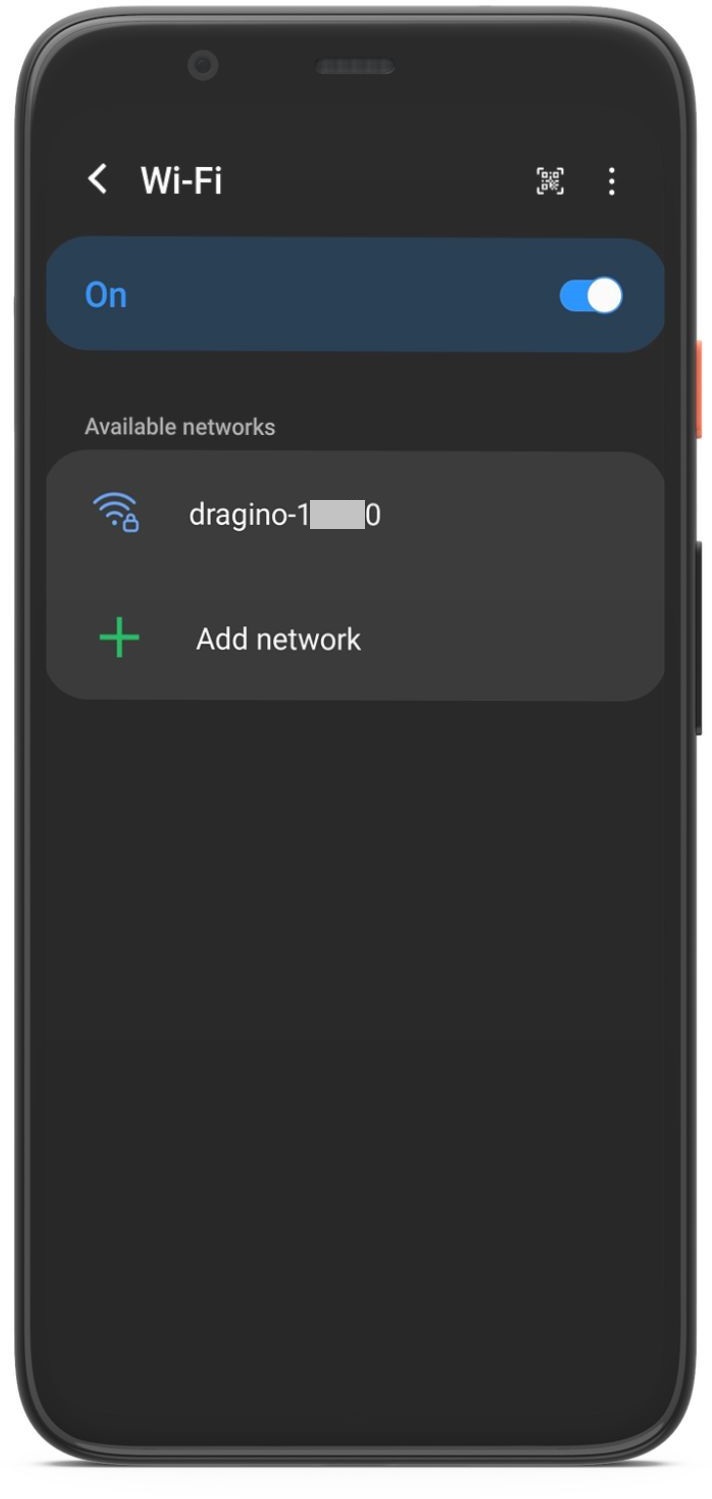
1. Search for a new Wi-Fi network called dragino-xxxxxx, where xxxxxx is the last 3 bytes of your gateway’s DEUI.
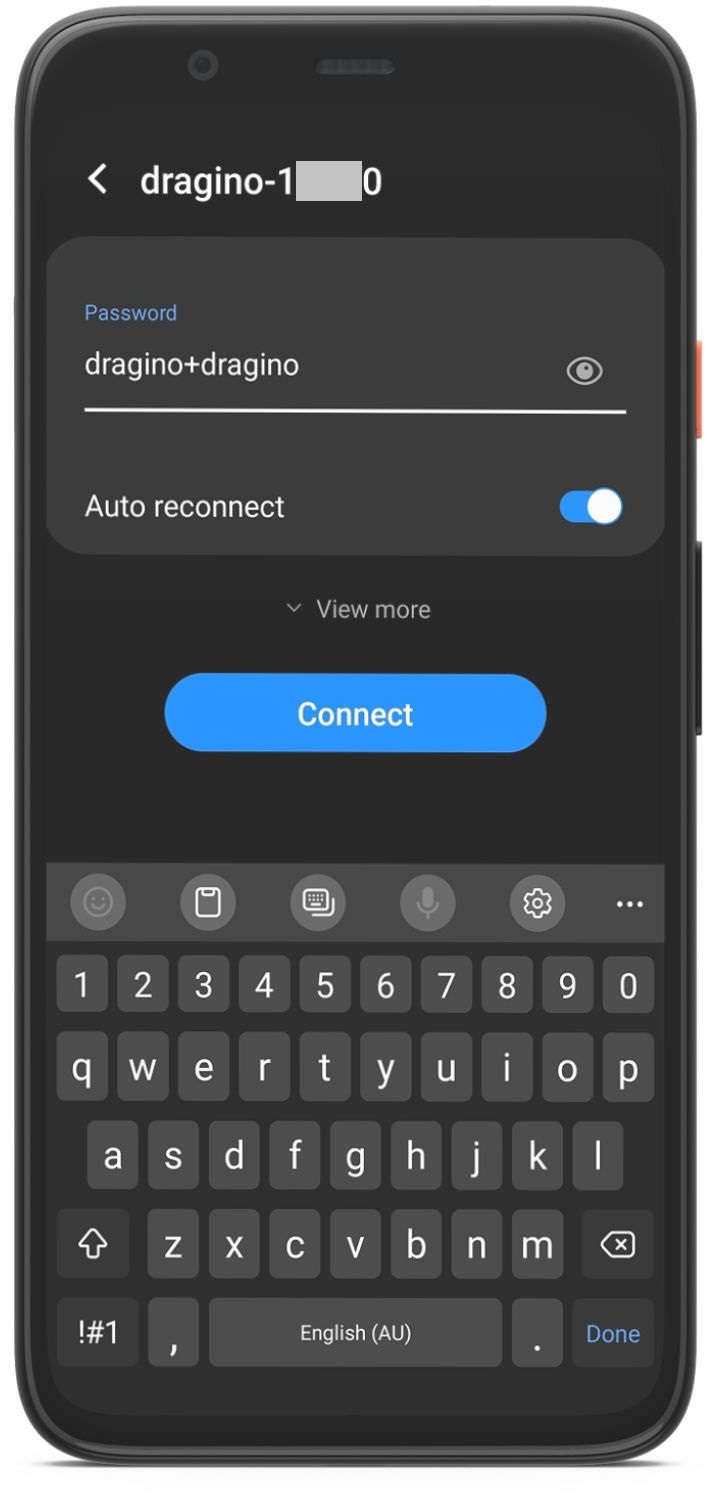
2. Connect to the network using the default password: dragino+dragino. Confirm that the connection is successful before continuing.
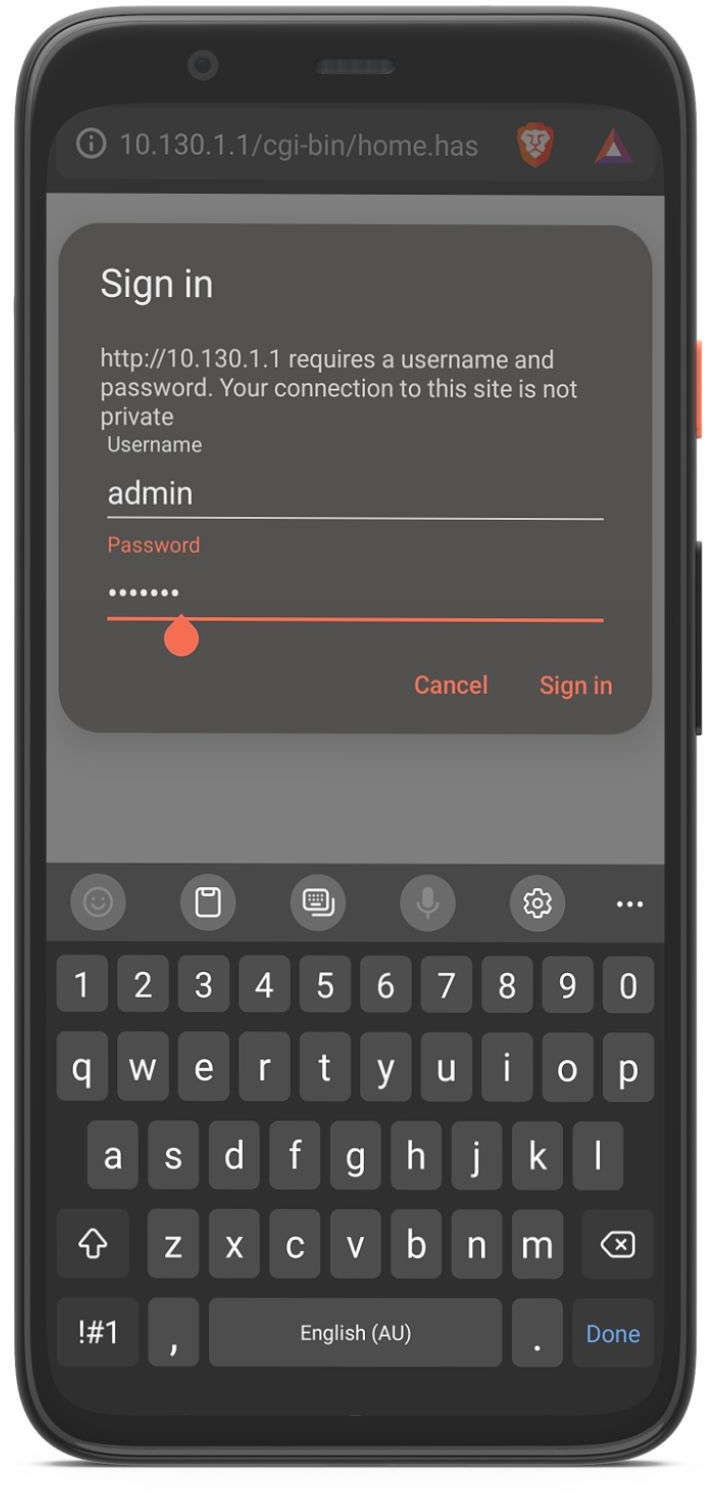
3. Open a web browser and go to http://10.130.1.1. Log in to the gateway’s user interface with username admin and password dragino.
How to Configure Wi-Fi Settings on Your LoRaWAN Gateway
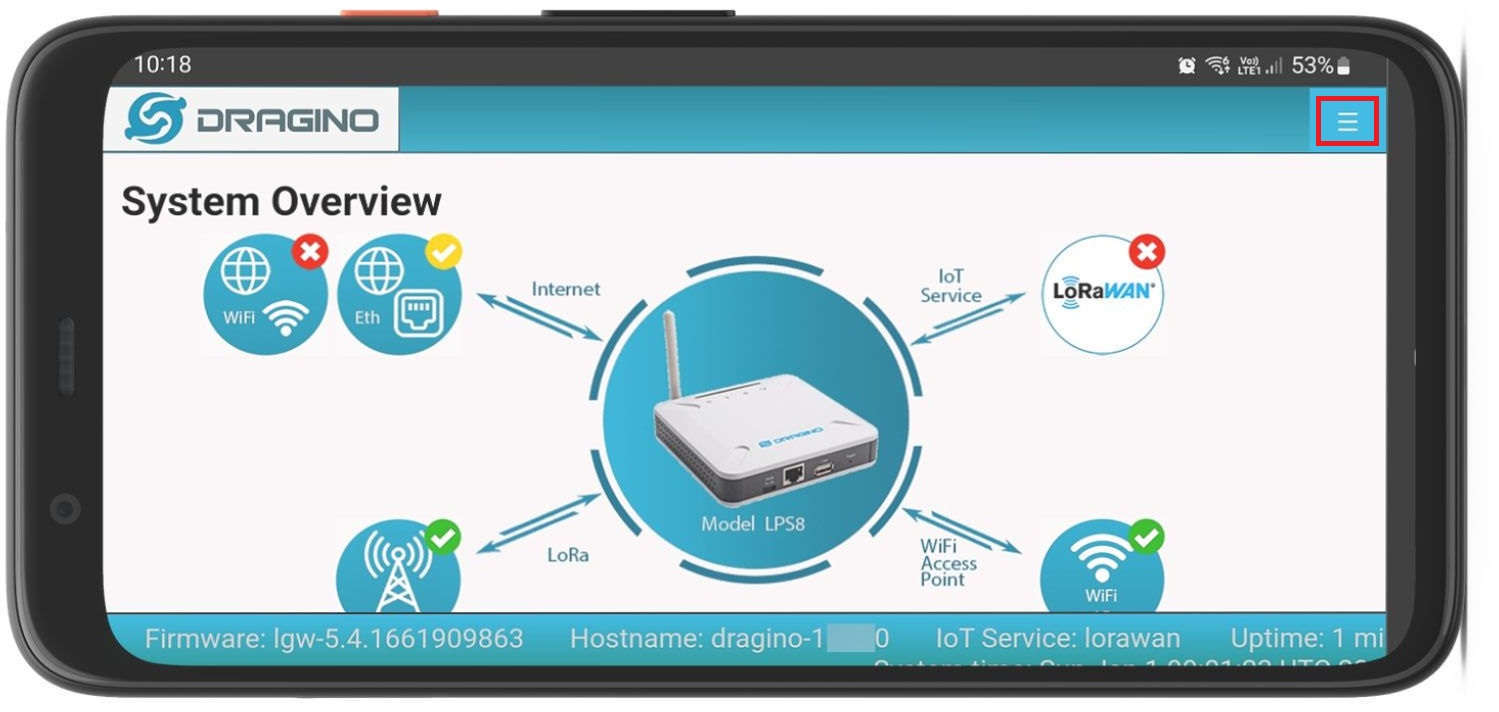
If the login was successful, you will land on the main user interface, which shows the gateway's connection status. If the gateway is not yet connected via Ethernet, the LoRaWAN and WiFi icons will show a red cross.
Click the classic menu icon in the top-right corner of the screen and navigate to Network >> Wi-Fi.
Note:
You may need to zoom out on your smartphone to see the menu icon clearly.
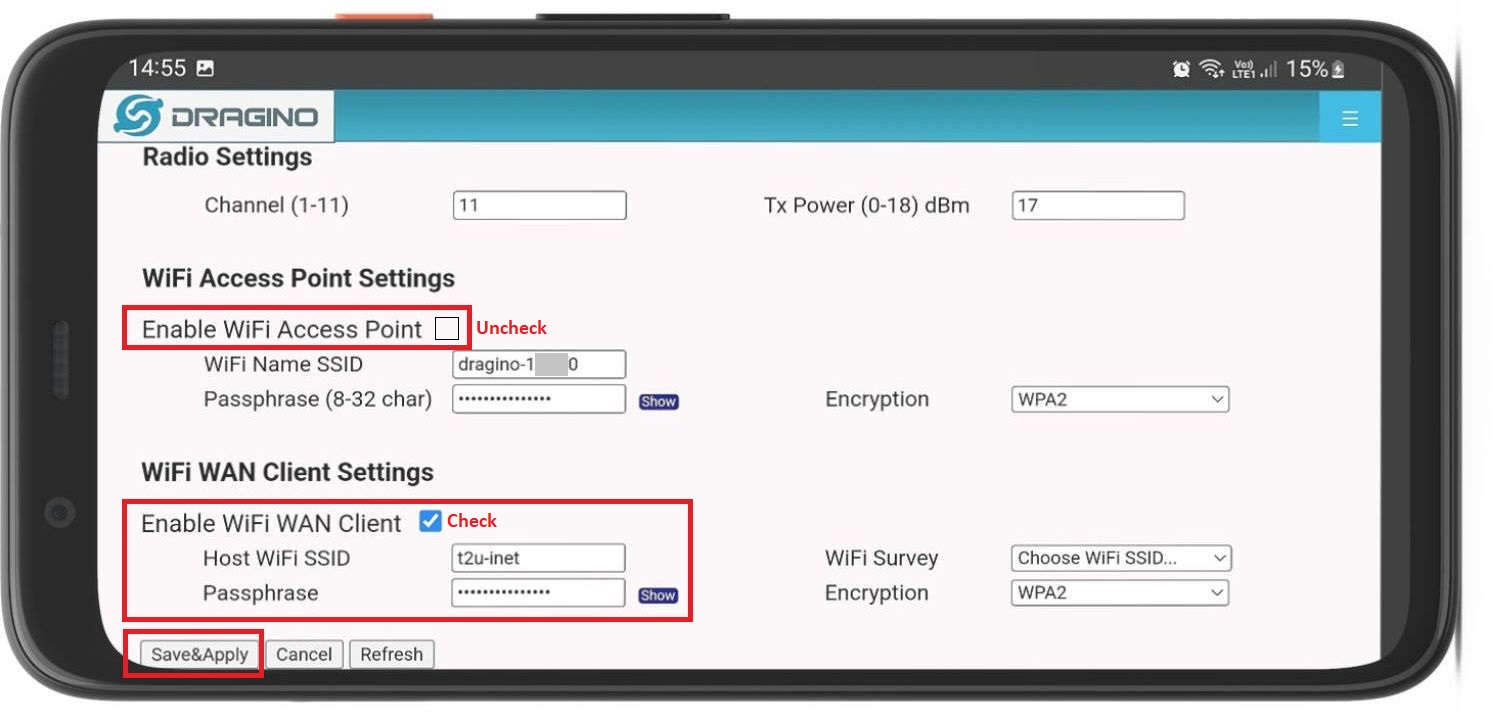
Scroll down to find the WiFi WAN Client Settings section. Tick the Enable WiFi WAN Client checkbox to activate it. Then, use the Wi-Fi Survey field to scan and select your desired Wi-Fi SSID.
Choose the correct Encryption method for your router and enter your Wi-Fi password (passphrase).
Before clicking Save and Apply, make sure to uncheck the Enable WiFi Access Point option. The Wi-Fi Client mode will not work if the AP mode is also enabled, and you may lose access to the gateway UI.
Note:
It's also a good idea to change the default Wi-Fi Access Point passphrase to prevent unauthorised access. Remember to click Save and Apply after making any changes.
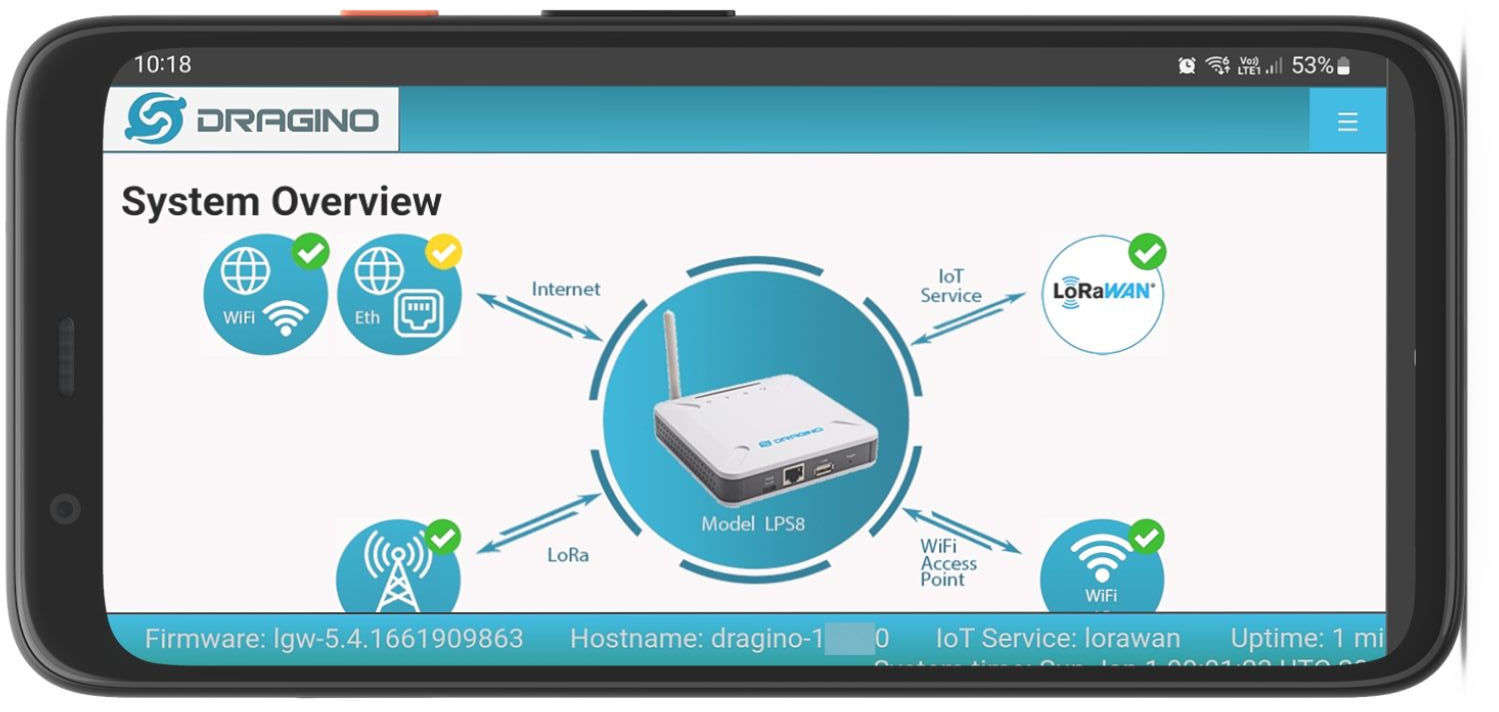
Once settings are saved, click the menu icon in the top-right corner again and return to the Home screen.
If the Wi-Fi connection was configured correctly, you should now see a green tick next to the WiFi icon—indicating a successful internet connection.
If your gateway is also properly linked to your T2U account, you should see a green tick next to the LoRaWAN icon. If this icon still shows a red cross, you may need to adjust the gateway configuration. Read our troubleshooting guide here.
Confirm Your Gateway is Connected to the Telemetry2U Platform
To verify your Dragino LoRaWAN gateway is successfully connected to Telemetry2U, log in to the Telemetry2U platform.
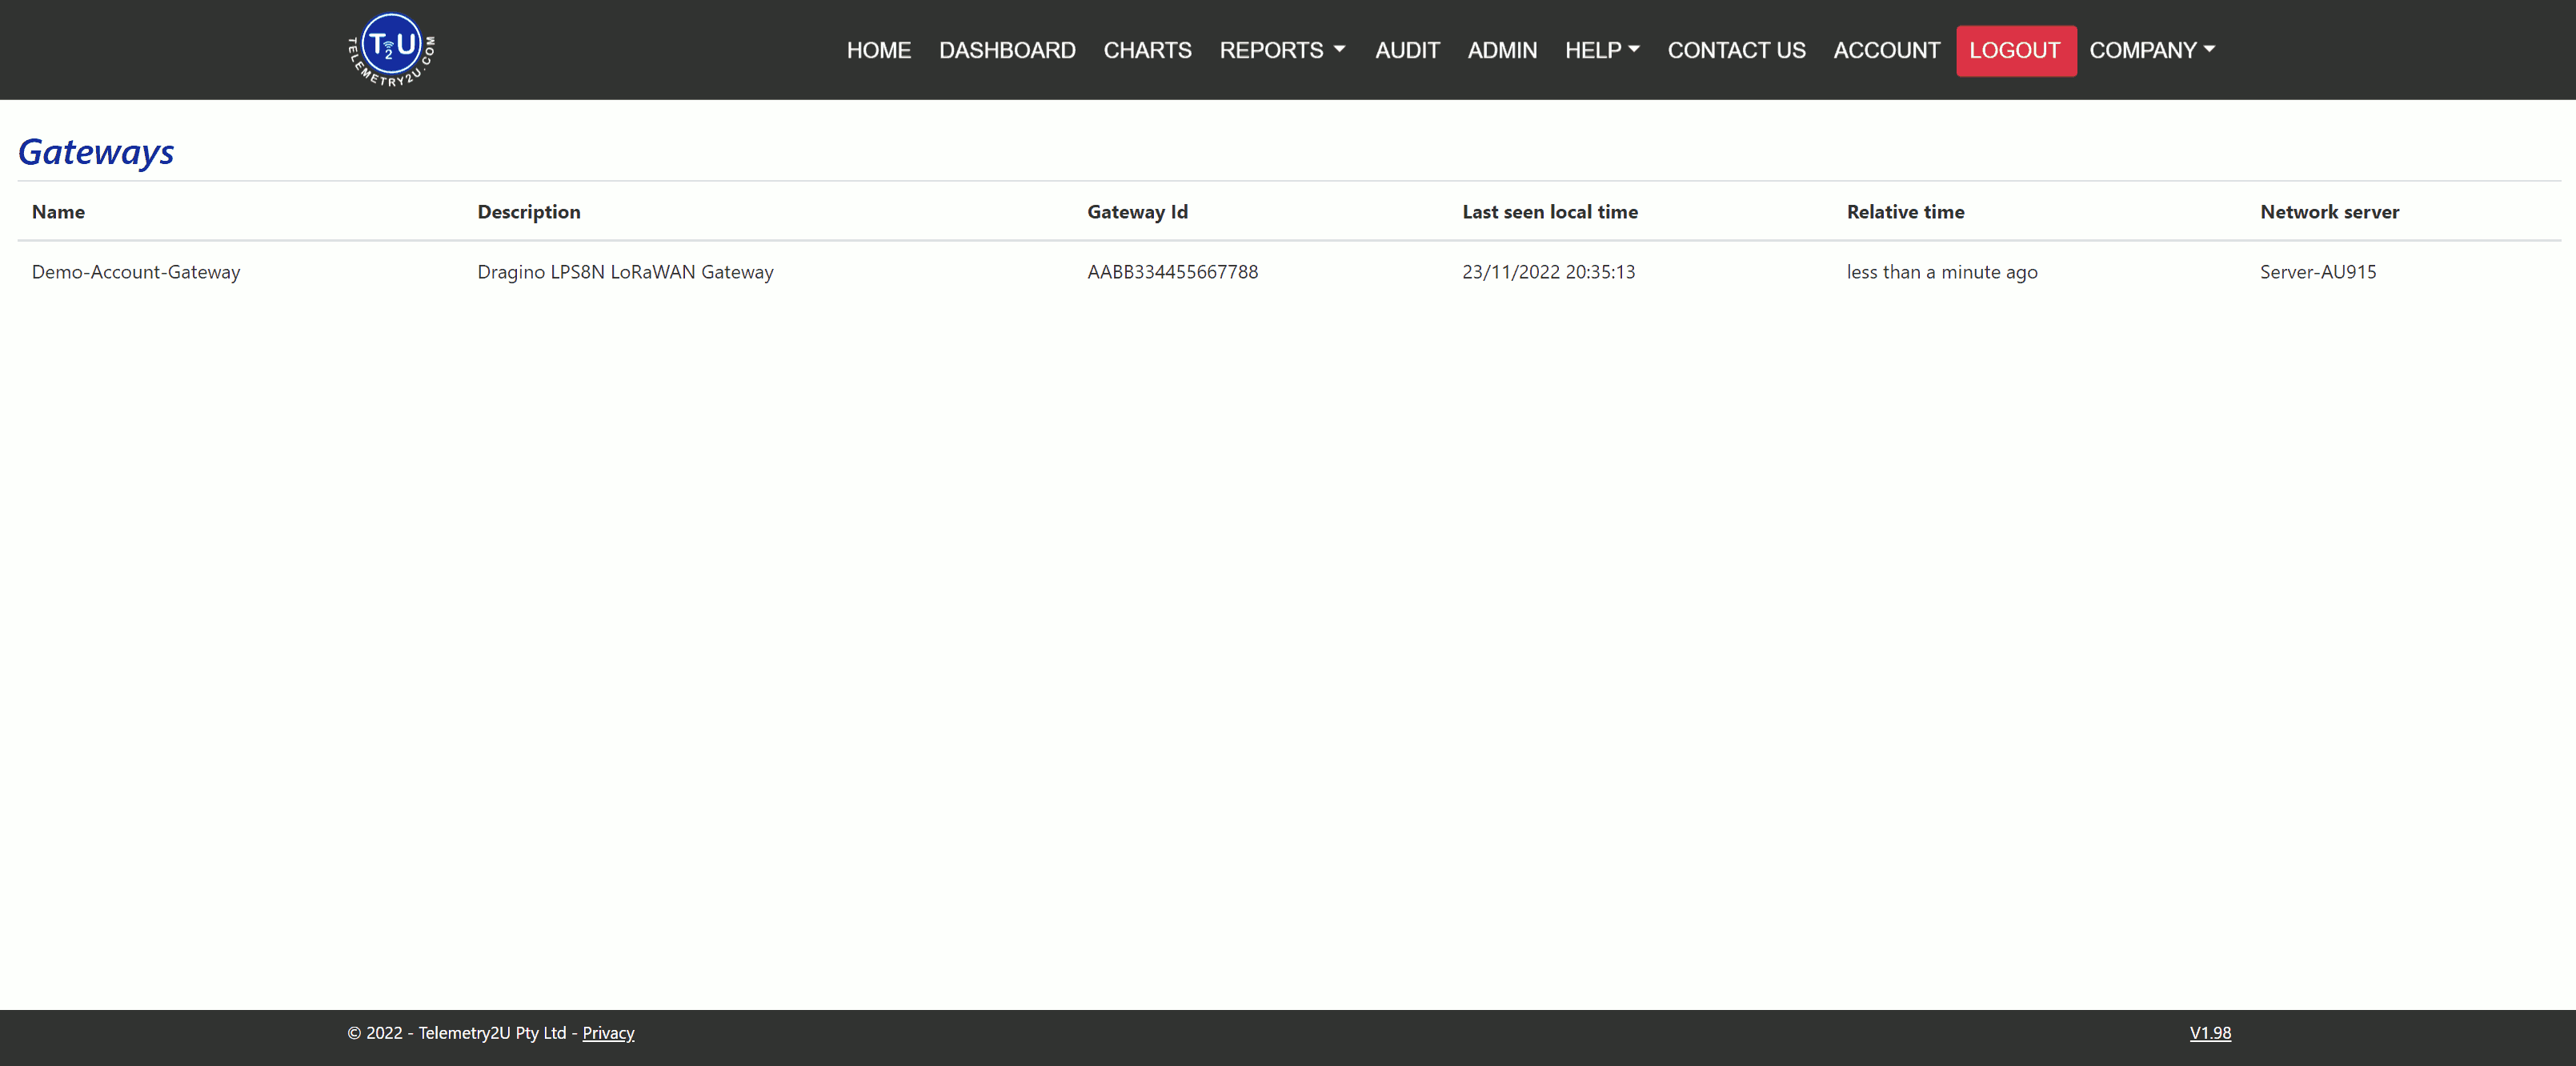
Once logged in, go to Admin >> Gateway Status.
Under the Gateway Status page, look for the Relative Time field. If it shows a value like less than a minute ago, this indicates the gateway’s 30-second keep-alive signal is being received and the connection is active.
Note:
If you purchased a pre-configured gateway and are unable to see it listed on the Telemetry2U platform, please contact us so we can resolve the issue for you.
How to Access Your Dragino Gateway After Wi-Fi Setup
Once your Dragino LoRaWAN gateway is successfully connected to your local Wi-Fi network (with the access point disabled), you will no longer be able to connect via the built-in access point. Instead, you can access the gateway from any other device connected to the same local Wi-Fi network—such as a PC, laptop, or smartphone.
To do this, you first need to identify the IP address assigned to the gateway by your router. Here are two common methods:
- Log in to your router’s admin settings and look for a list of connected devices. Refer to your router’s user manual or contact your IT department for instructions.
- Download and run Advanced IP Scanner. This tool will scan your local network and list all connected devices. You can identify the Dragino gateway by matching the MAC address on the bottom of the device. Dragino MAC addresses start with A8:40:41:xx:xx:xx.
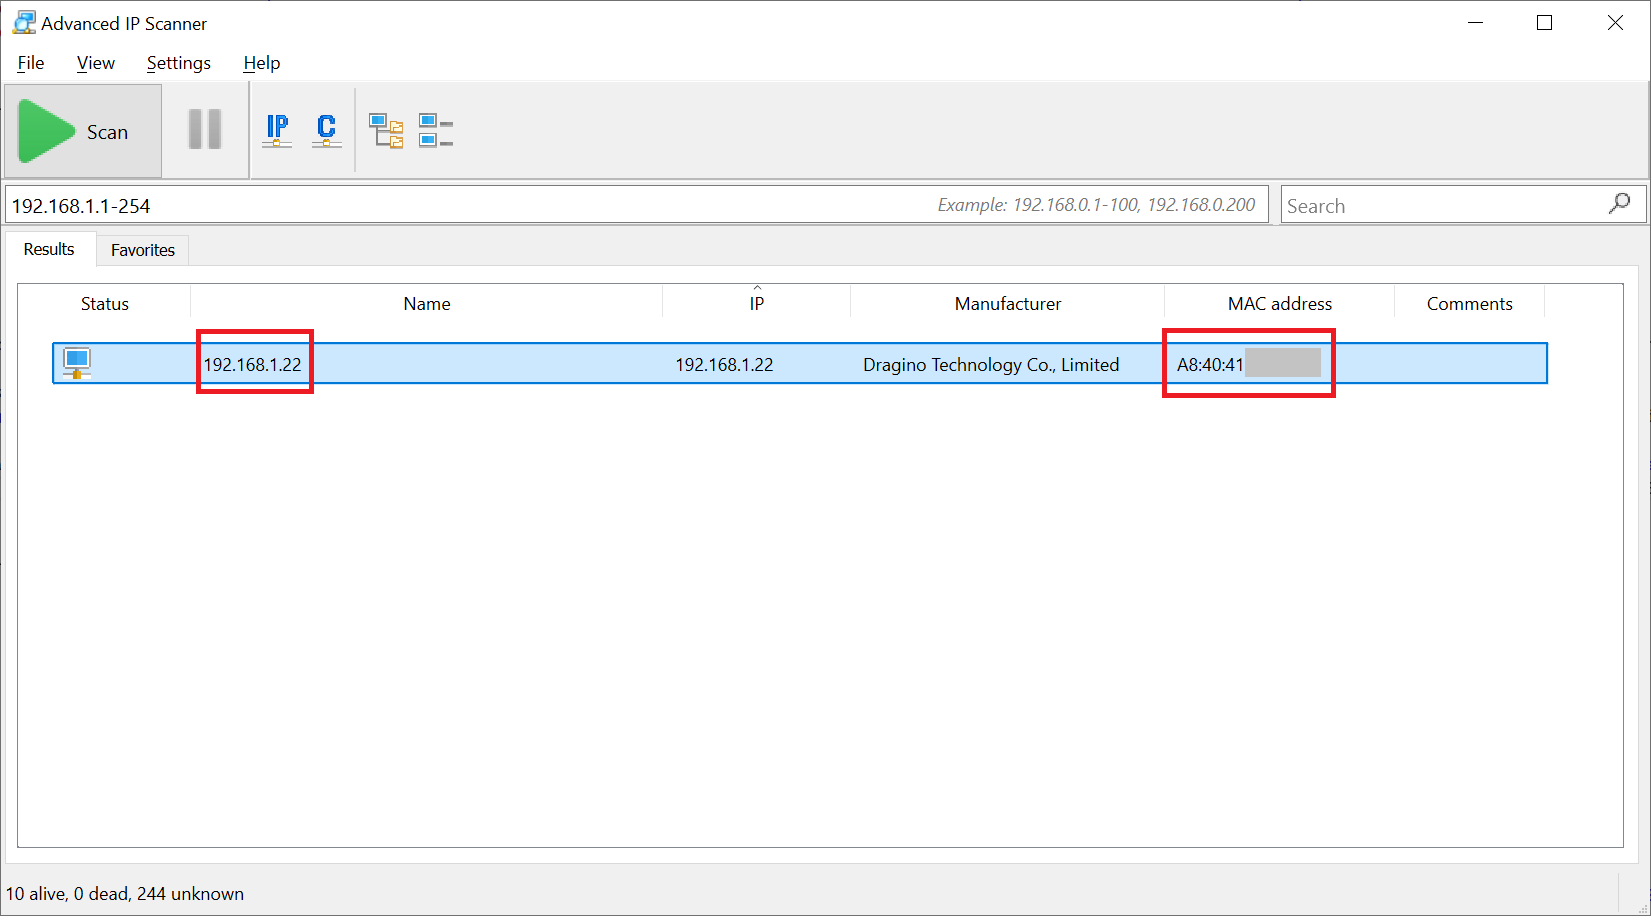
Once you've located the gateway’s IP address, open a web browser on any device connected to the same network. Enter the IP address followed by port 8000, for example: 192.168.1.22:8000.
Log in to the Dragino gateway interface using the default credentials—admin as the username and dragino as the password—unless they’ve been changed.