Configure Your LoRaWAN Gateway for the Telemetry2U IoT Platform
This guide walks you through configuring your LoRaWAN gateway to connect with the Telemetry2U IoT platform. Learn how to forward packets, set up network parameters, and get your sensors online quickly
LoRaWAN Gateway Configuration for the Telemetry2U IoT Platform
When you purchase a LoRaWAN gateway and license from Telemetry2U, it arrives factory-tested, preloaded with the latest firmware, and ready for plug-and-play installation. In most cases, all that’s needed is power and an Ethernet connection—no router or firewall changes are typically required.
If your gateway isn't communicating with Telemetry2U servers, you may need to adjust your network settings. Learn more about firewall and router configurations here.
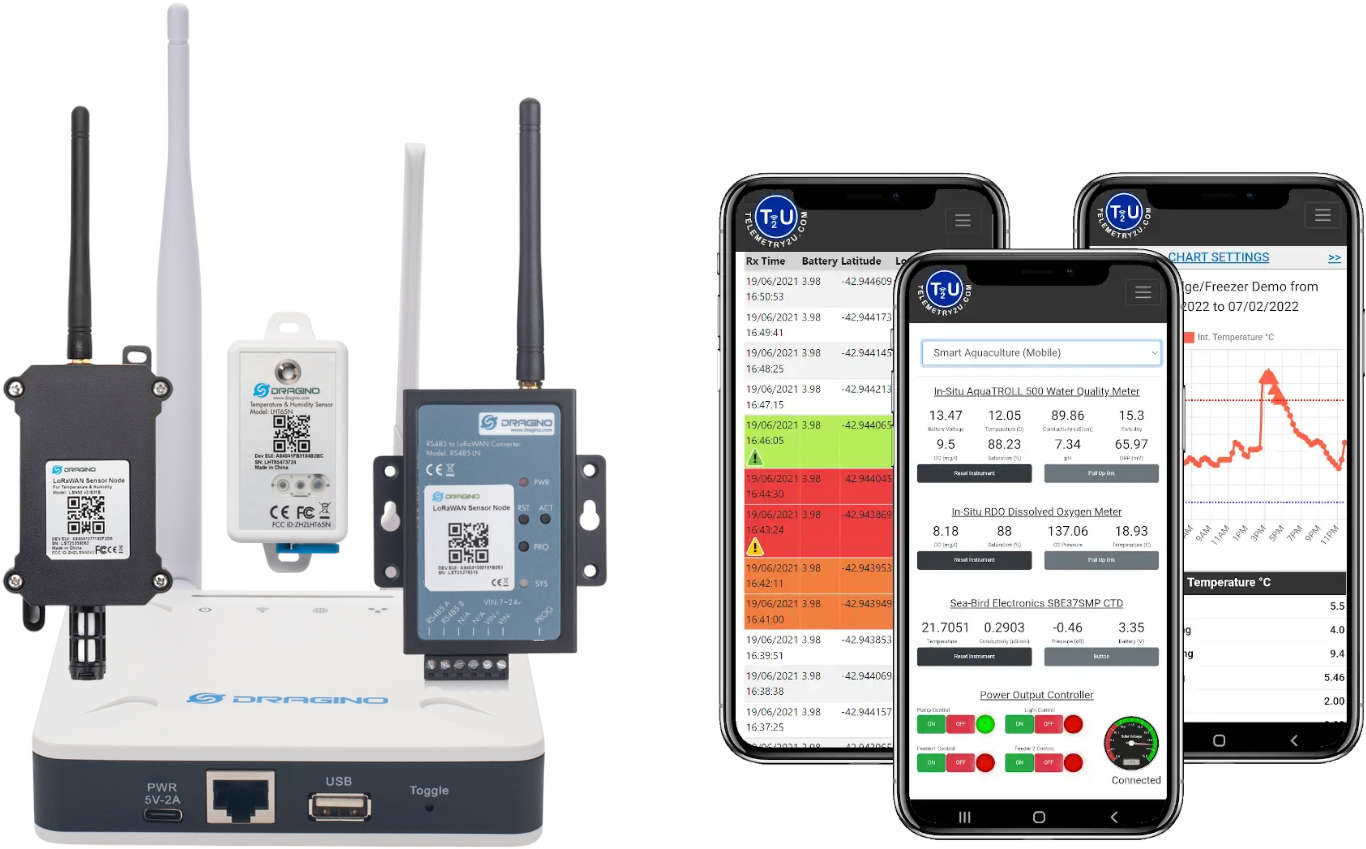
Telemetry2U supports a wide range of LoRaWAN gateways, but we supply Dragino gateways through our online store. The links below direct you to Dragino’s official manuals for more details:
- Dragino LPS8 – 8-channel LoRaWAN Gateway
- Dragino LG308 – 8-channel LoRaWAN Gateway with 4G
- Dragino DLOS8 – Outdoor 8-channel LoRaWAN Gateway with 4G
This guide (based on the Dragino LG308) highlights key gateway features and how to connect it to the Telemetry2U platform. While menu layouts may vary slightly, most Dragino gateways use a similar structure.
When you receive your gateway, you may wish to change the default password or set up Wi-Fi connectivity. To access your gateway, log in using the default username ‘admin’ and password ‘dragino’.
Accessing the Dragino Gateway for First-Time Configuration
You can connect to a Dragino LoRaWAN gateway using one of the following three methods:
- Via Wi-Fi Access Point: On first power-up, Dragino gateways create an unsecured Wi-Fi access point named ‘Dragino-xxxxxx’. Connect using any Wi-Fi-enabled device (laptop, PC, or smartphone) with the default password ‘dragino+dragino’. The default IP is 10.130.1.1, and your device will receive an address in the 10.130.1.x range. Enter http://10.130.1.1 in your browser to access the configuration screen. For a more detailed break down, check our our page, Configure Your LoRaWAN Gateway’s Wi-Fi Using a Smartphone.
- Via WAN/Router: When using Ethernet or Wi-Fi, Dragino LoRaWAN gateways will obtain an IP address from your router via DHCP. Access the UI by entering the IP with port 8000 in your browser (e.g., http://192.168.1.100:8000). To find the IP, log into your router’s connected devices list (look for ‘Dragino-xxxxxx’). Login credentials: username ‘admin’, password ‘dragino’.
- Via LAN Port: Some Dragino LoRaWAN gateways have a LAN port that acts as a DHCP server by default. Connect directly to a PC or laptop with DHCP enabled. Open a browser and go to http://10.130.1.1. Login credentials are username: ‘admin’ and password: ‘dragino’.

Understanding the Dragino Gateway Status Indicators After Login
Once logged into the Dragino LG308 gateway's user interface, the home screen provides a quick overview of all current connection statuses.
- A green tick indicates the connection is active and currently in use.
- An orange tick means the connection is working but not actively being used.
- A red cross indicates the connection has failed and is not functioning.
Hover over any of the icons to view additional details about the specific connection.
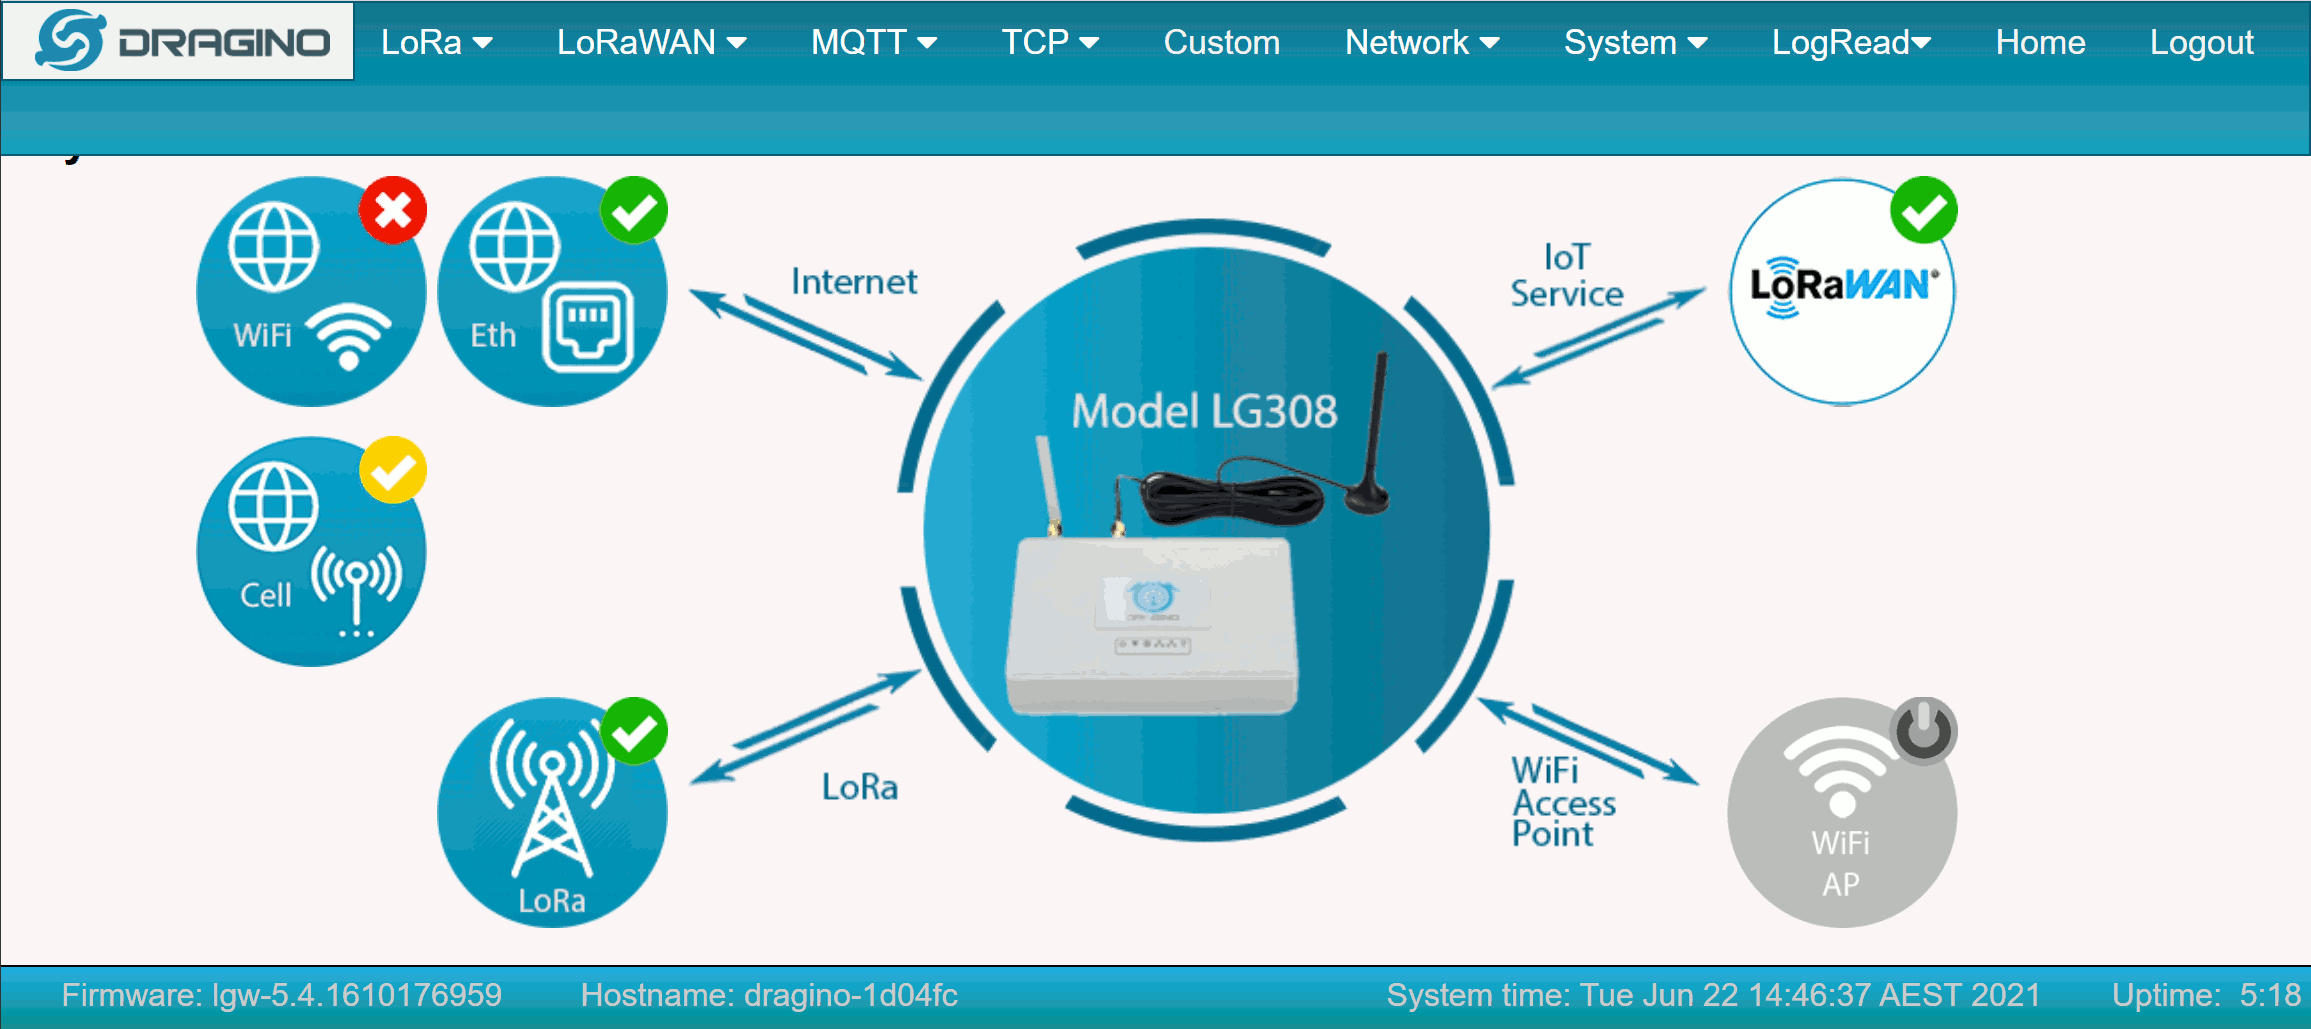
The 4G (cellular) connection is usually a backup option but can be configured as the main internet connection. For successful communication, the LoRa, IoT Service, and at least one Internet icon must display a green tick. If the Internet icon shows a red cross, you may need to update your router or firewall settings.
After logging into the gateway's user interface, we recommend performing a few basic security steps, such as changing the default password.
Securing Your Dragino Gateway: Change the UI Login Password
Dragino gateways ship with a default username and password, which are publicly available in documentation. To protect your device from unauthorised network access, it's strongly recommended to change the UI password. To do this, go to System >> General.
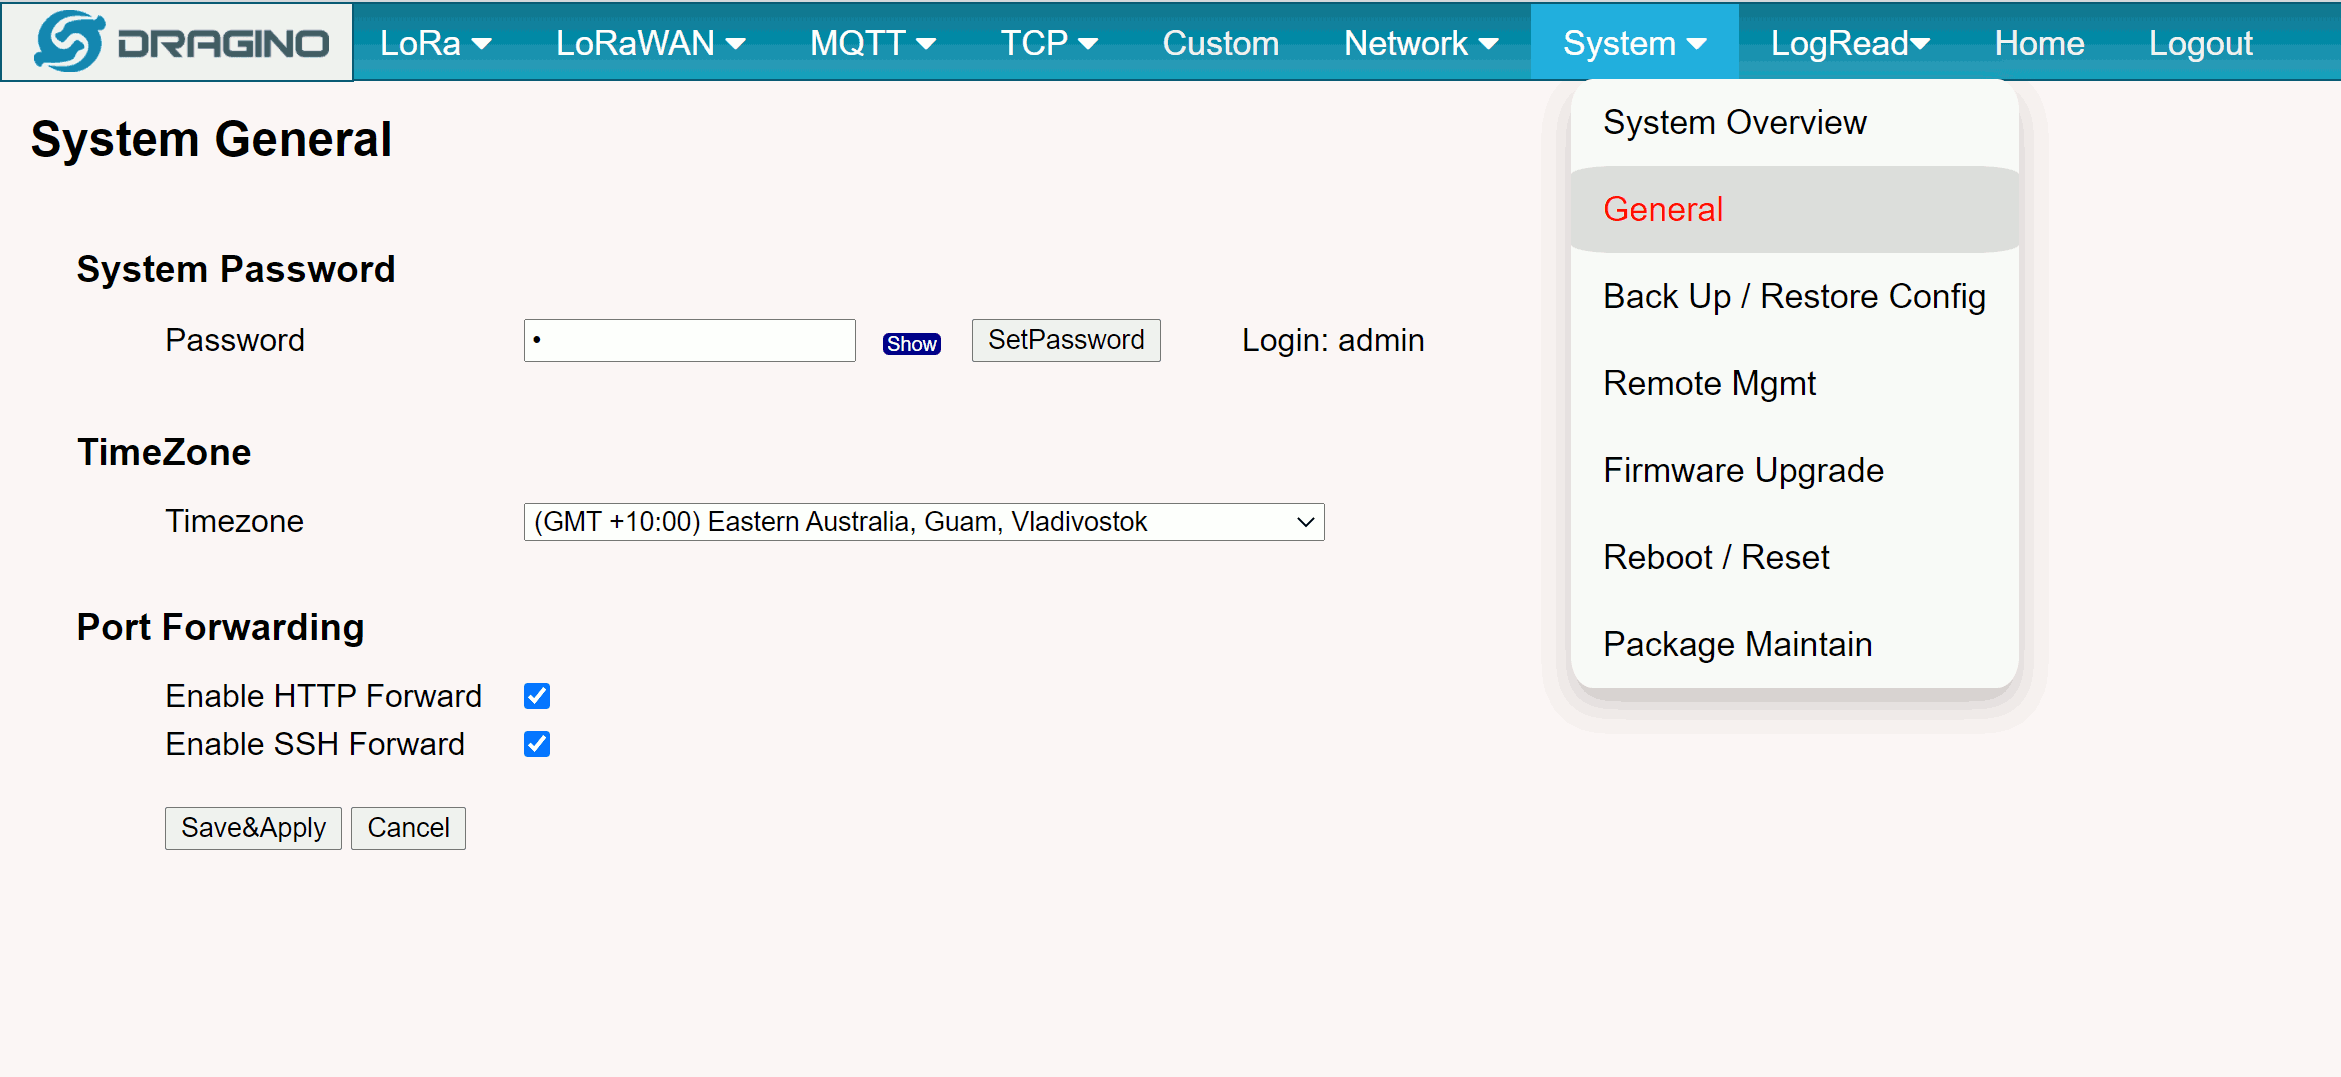
There are no strict requirements for password format, but for stronger protection, use at least one capital letter, a number, and a special character. After entering your new password, click SetPassword, then hit Save & Apply to confirm.
Set Up Wi-Fi Connectivity on Your Dragino LoRaWAN Gateway
To connect your Dragino LoRaWAN gateway to the internet wirelessly instead of via Ethernet, go to Network >> WiFi from the main menu.
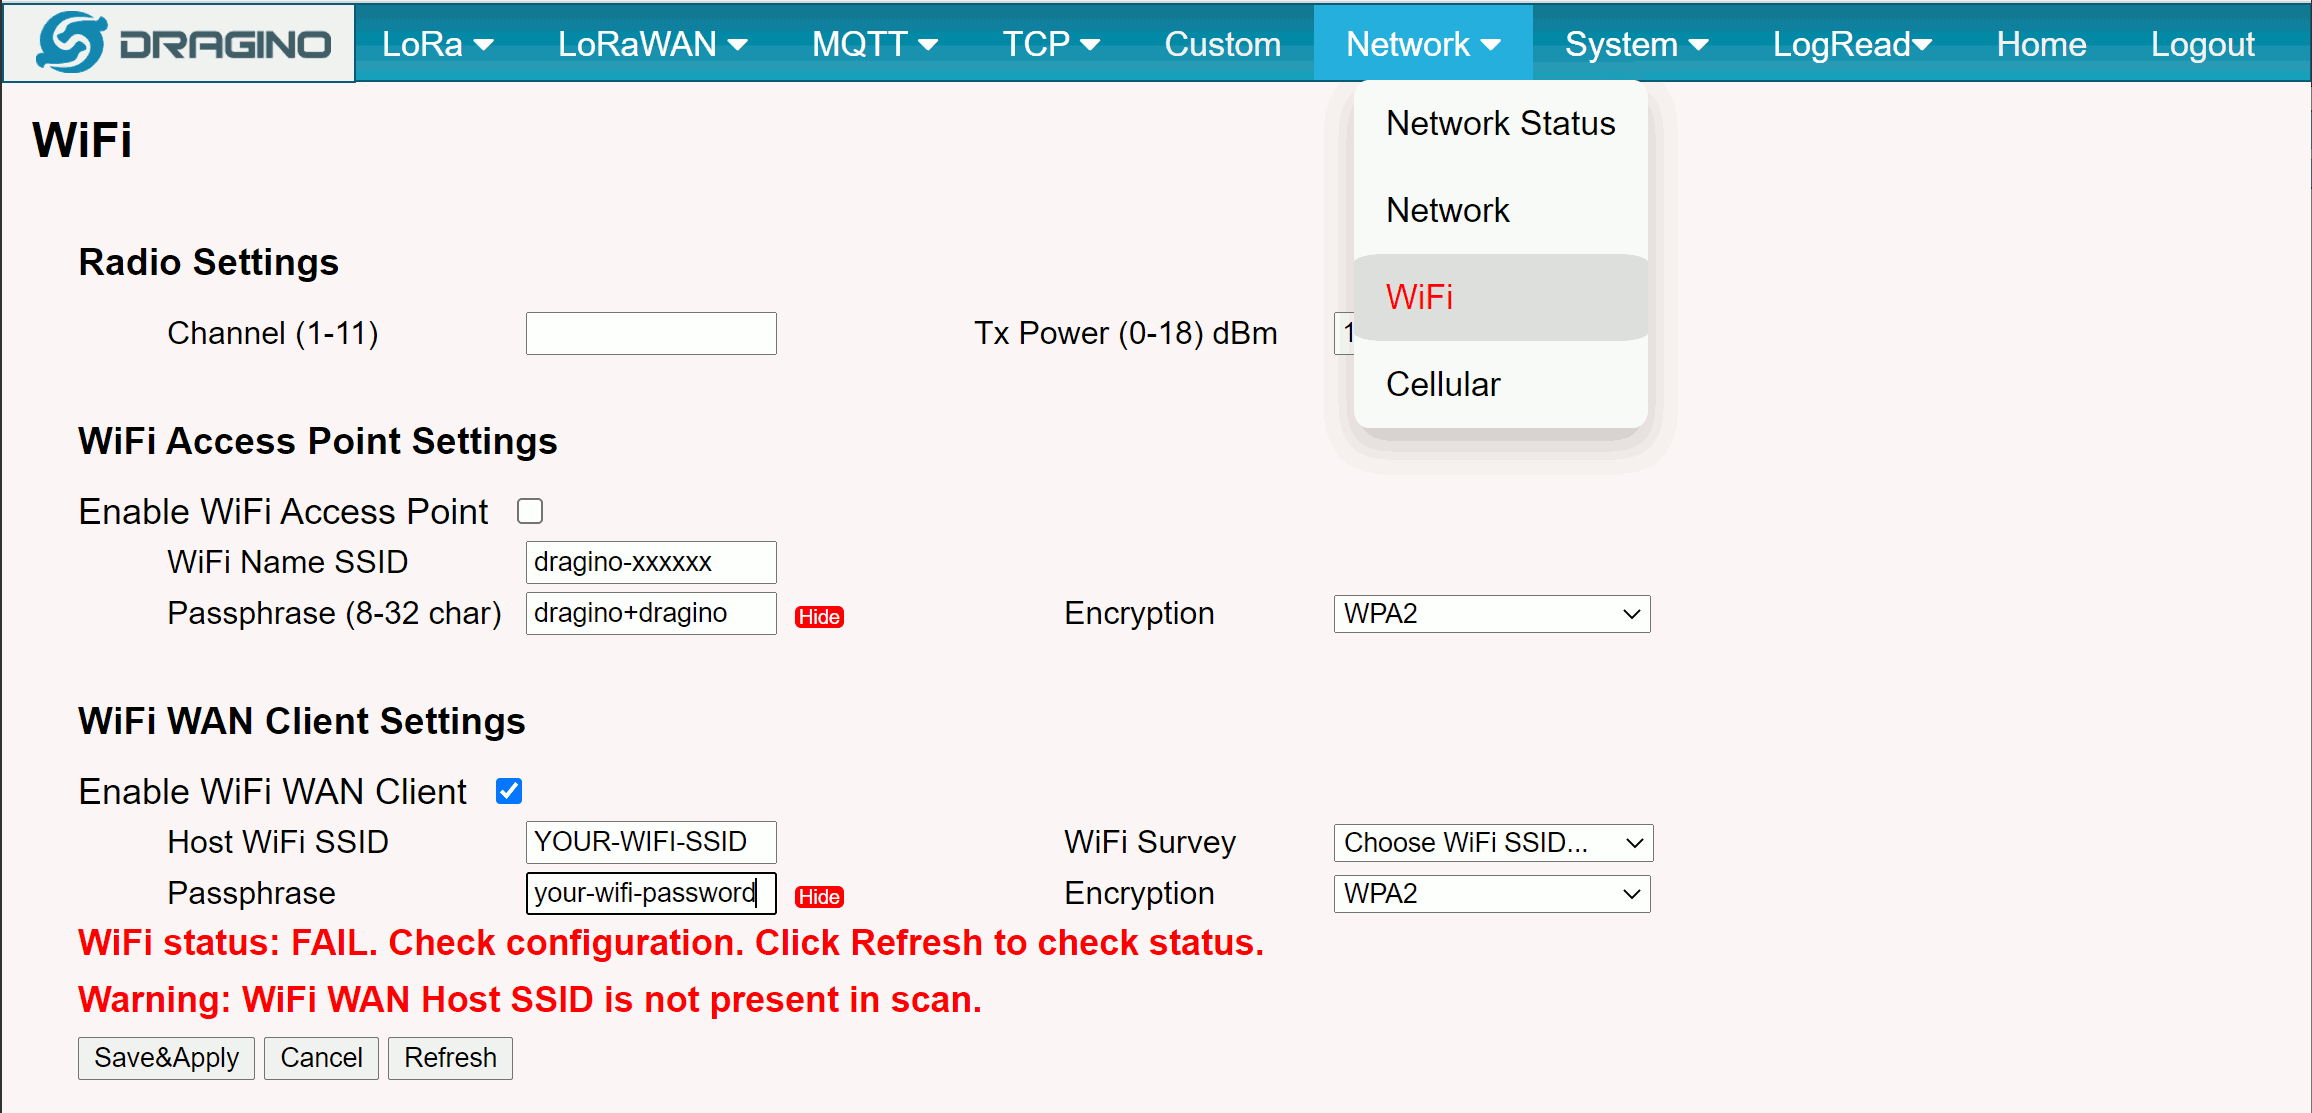
To enable Wi-Fi client mode, check Enable WiFi WAN Client Settings. Then fill in the following:
- Host WiFi SSID – your network’s name.
- Passphrase – your Wi-Fi password.
- Encryption – typically WPA2, depending on your router.
You may disable the default Wi-Fi Access Point if desired, but we recommend confirming a successful WAN connection first. Otherwise, you may need to reset the device to regain access.
LoRaWAN Gateway Network Configuration
Gateways supplied by Telemetry2U are pre-configured and require no manual setup. If the settings are accidentally reset or modified, the following information will help reconnect your gateway to Telemetry2U’s servers.
Configure LoRa Settings on Your Dragino Gateway
Dragino gateways use a 915MHz LoRa radio signal to communicate with end-devices such as environmental sensors. These settings are located under LoRa >> LoRa in the gateway menu and must align with Telemetry2U’s configuration. Do not adjust them unless instructed.
In Australia, Telemetry2U uses the AU915 band with Sub-band 2 (channels 8–15), typically operating between 918.8 and 918.2 MHz. These frequencies may vary depending on your region.

Although Dragino gateways do not include GPS modules, you may manually enter coordinates if desired. This is optional and not necessary for standard operation.
If the LoRa settings are incorrect or not functioning, a red cross will appear on the LoRa icon on the home screen.
Gateway LoRaWAN Settings
The gateway uses LoRaWAN to communicate with Telemetry2U’s network server and deliver sensor data. To access the LoRaWAN settings, navigate to LoRaWAN >> LoRaWAN in the gateway menu.
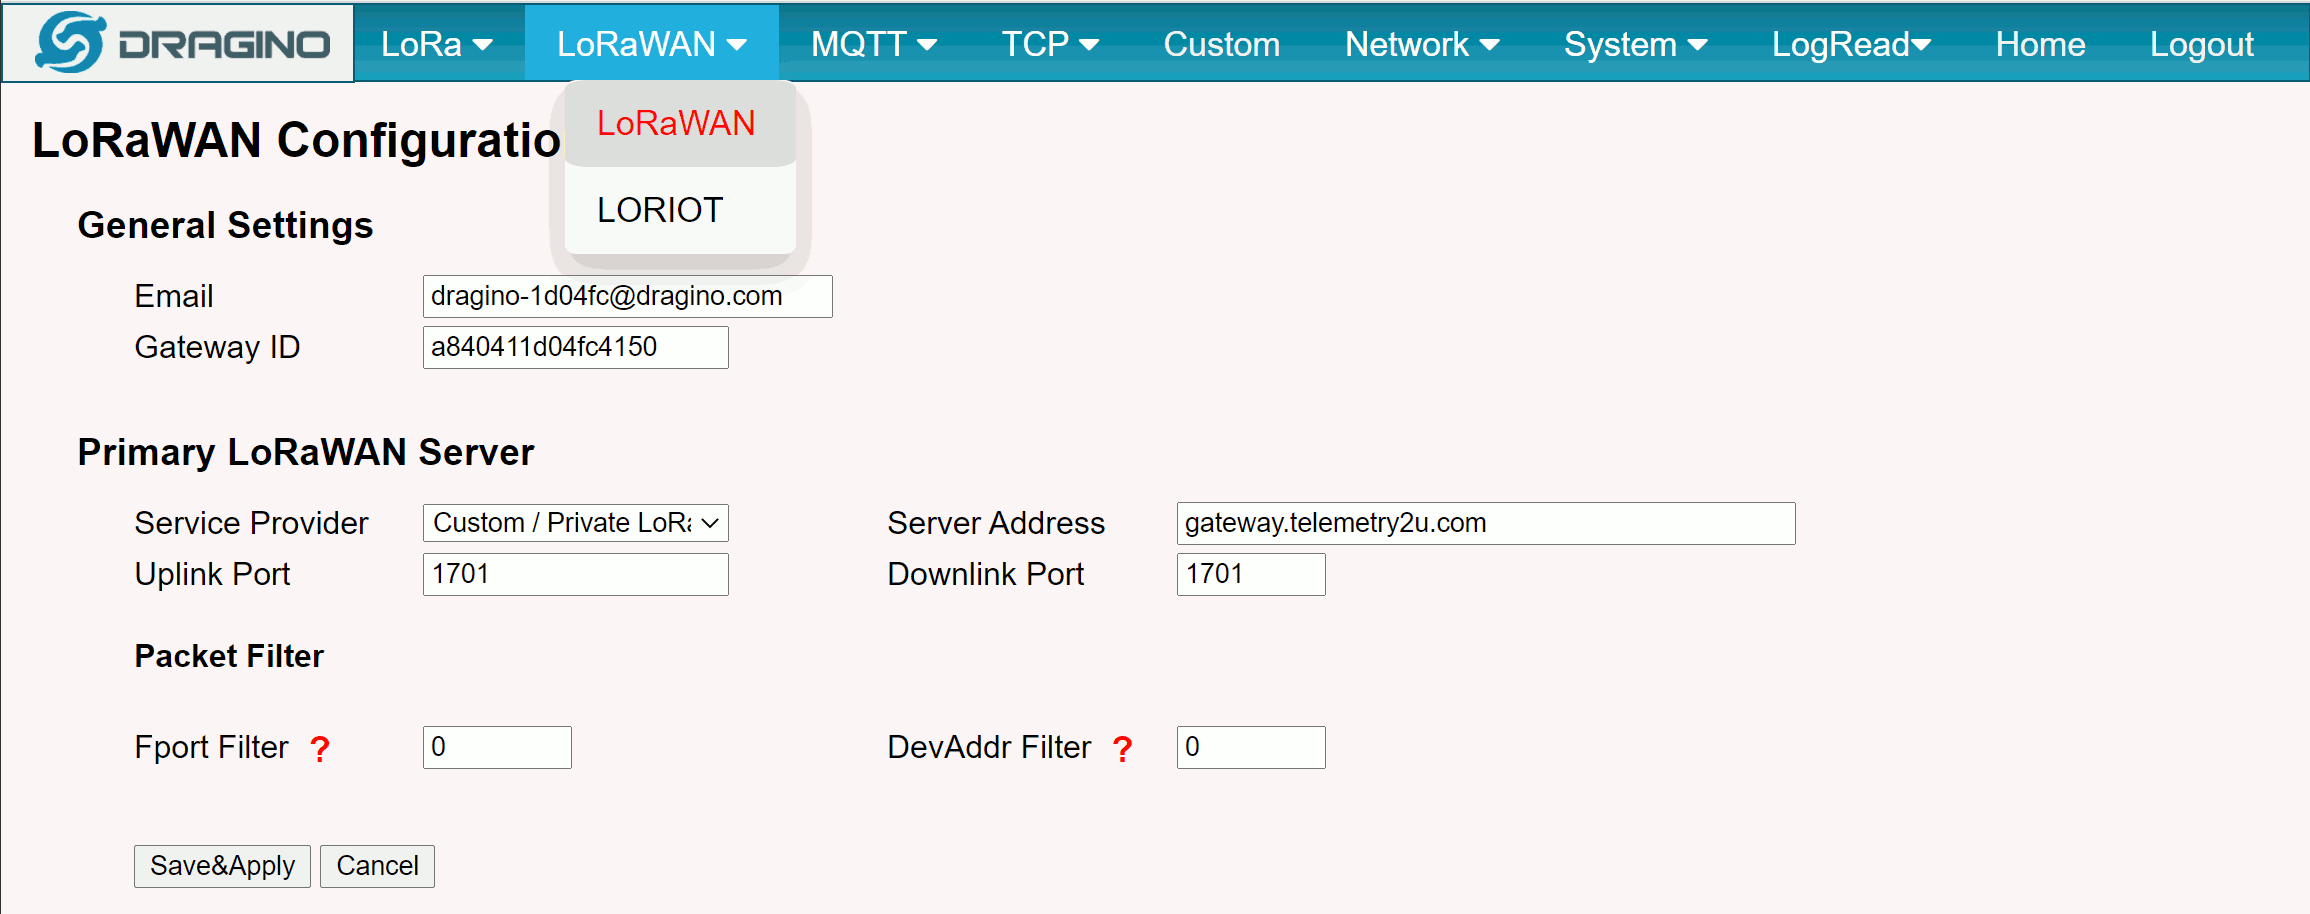
Telemetry2U uses a Custom/Private LoRaWAN server, and the server address and port depend on your region’s frequency plan. Refer to the table below for details.
| Frequency Plan | Server Address | Uplink Port | Downlink Port |
|---|---|---|---|
| AS923 | as923.telemetry2u.com | 1700 | 1700 |
| AS923-2 | as923.telemetry2u.com | 4462 | 4462 |
| AS923-3 | as923.telemetry2u.com | 4463 | 4463 |
| AS923-4 | as923.telemetry2u.com | 4464 | 4464 |
| AU915 | au915.telemetry2u.com | 3751 | 3751 |
| CN470 | cn470.telemetry2u.com | 4466 | 4466 |
| CN779 | cn779.telemetry2u.com | 4467 | 4467 |
| EU433 | eu433.telemetry2u.com | 4468 | 4468 |
| EU868 | eu868.telemetry2u.com | 4469 | 4469 |
| IN865 | in865.telemetry2u.com | 4470 | 4470 |
| KR920 | kr920.telemetry2u.com | 4471 | 4471 |
| RU864 | ru864.telemetry2u.com | 4472 | 4472 |
| US915 | us915.telemetry2u.com | 4473 | 4473 |
The Email Address and Gateway ID fields are unique to each gateway and should not be modified. If these values do not match the records on Telemetry2U’s servers, your gateway will not connect and a red cross will appear on the IoT Service icon on the home screen.
Each frequency plan uses specific Uplink and Downlink ports. Please make sure the correct ports are used. See the table below for guidance.
Ensure that the packet filter values are set to 0.
Router and Firewall Exceptions for LoRaWAN Gateways
In most cases, your LoRaWAN gateway will connect to the internet without manual changes. However, in secured network environments, you may need to configure router or firewall rules to allow communication.
Outbound UDP for Gateway Communication
Telemetry2U gateways use UDP to send data to our server. While most routers support outgoing UDP by default, you may need to open the specific UDP port used by the gateway if communication fails.
When a server receives data from the gateway, it responds with a PUSH_ACK to the same ephemeral source port. Firewalls typically allow this as part of the session, so a permanently open incoming port is not required—just the ability to accept the return packet.
Allowing Network Time Protocol (NTP)
UDP port 123 (NTP) must be open for accurate timekeeping. The gateway attempts to sync time using the following NTP servers:
- server 0.openwrt.pool.ntp.org
- server 1.openwrt.pool.ntp.org
- server 2.openwrt.pool.ntp.org
- server 3.openwrt.pool.ntp.org
We recommend allowing UDP traffic to any NTP server on port 123, as DNS-bound IPs may change. Your router/firewall must also allow UDP replies back to the gateway on the original source port.
Enabling ICMP Ping for Internet Checks
Gateways use ICMP ping to test connectivity (e.g., to 1.1.1.1 and 8.8.8.8). Ensure that ICMP echo requests and replies are permitted through your network.
MAC Address Whitelisting
If using MAC address filtering, whitelist the gateway’s MAC address. The Wi-Fi MAC is on the device label. The Ethernet MAC is identical except the final hex character is increased by 2. For example, if Wi-Fi = A8:40:41:AA:BB:CC, then Ethernet = A8:40:41:AA:BB:CE.
Additional Resources and Support
Read more about the technical details of LoRaWAN and how it works with Telemetry2U here.
For broader industry context, visit the LoRa Alliance.
Need assistance with your LoRaWAN gateway setup? Get in touch with us.